There are two types of resources in your Minecraft world – renewable and non-renewable. The non-renewable resources are the ones that cannot be artificially produced, while the renewable ones are farmable and can be multiplied. In this guide, we’ll focus on one very useful renewable block, which is cobblestone. We will show you how to make a cobblestone generator (or cobblestone farm) in the world of Minecraft. This will help you have an unlimited supply of cobblestone for all your amazing house builds.
What Is a Cobblestone Generator?
Cobblestone generator is a fancy name for a simple mechanic. Water and lava interacting with each other in their different states produce different results. Pouring flowing water over still lava sources creates obsidian, which you can mine with a diamond pickaxe and craft an enchanting table or make a Nether portal. Flowing lava touching still water sources creates stone blocks.
And finally, flowing lava and flowing water together create cobblestone. Yeah, it’s that easy, but how you do automate this process?
Cobblestone generator is a controlled system that allows you to get infinite cobblestone blocks fairly conveniently. We’ll be taking a look at a stone generator as well in this guide, as it has an additional use.
You can either get cobblestone or stone from them, depending on the pickaxe enchantment you are using – silk touch for stone or fortune for cobblestone. Only the second type is a stone generator and the rest are exclusively cobblestone farms, so you won’t get stone from them.
Method 1: Simple Cobblestone Generator (Easiest)
As the title suggests, this is the simplest possible cobblestone farm to build. All you need is a bucket of water or a regular ice block and a bucket of lava.
- Dig out a four-block long, one-block wide, and one-block deep hole.
- Then, you need to break the second block in the hole from one end.
- Place water in the end closer to the hole, so the water can flow down. Alternatively, you can place an ice block in the same spot and break it with your hand.
- Then, place lava on the other end of the hole, the section that’s two blocks from the hole.
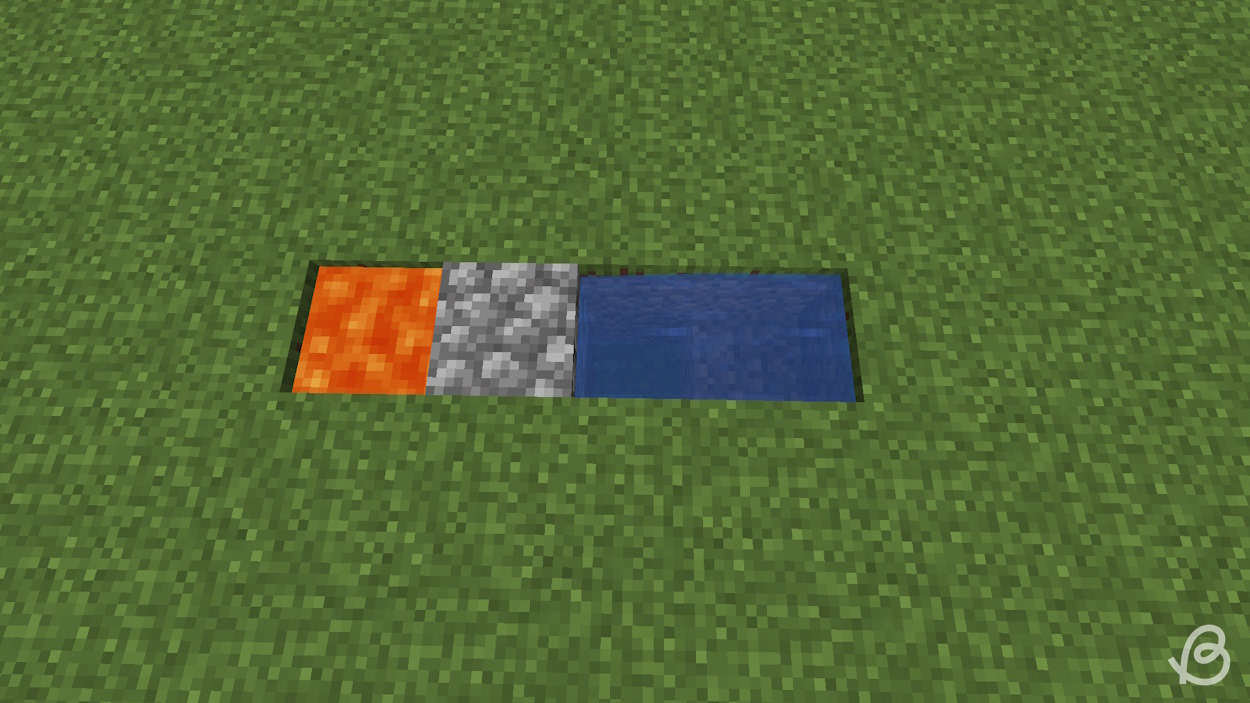
And that’s it. New cobblestone blocks will continually generate in the middle, and you can keep breaking them. This is a simple little generator, that’s quite bad efficiency-wise. So, you got to be thinking right now, why did we even mention this simple and bad design here?
Well, in some cases, you don’t have access to more materials and resources. Take, for example, the skyblock map. To do anything else in this challenging map, you first need to build a simple cobble generator, so you can reach other islands and be able to make more progress.
Method 2: Most Popular Cobblestone Generator Design
This cobblestone generator is far better than the first one, but it’s also way more expensive. It’s a stone generator and includes a collection system using hoppers. To build this generator, you will need the following:
- 2 Water Buckets
- 1 Lava Bucket
- 5 Stairs (of inflammable material)
- Solid blocks (of inflammable material)
- 5 Hoppers
- 2 Chests
- 1 Sign (any but a hanging sign makes it a little inconvenient)
Once you have gathered all the resources, follow the steps below to make this generator:
- Place a double chest in the ground and hook up five hoppers together with one facing into a chest from above.
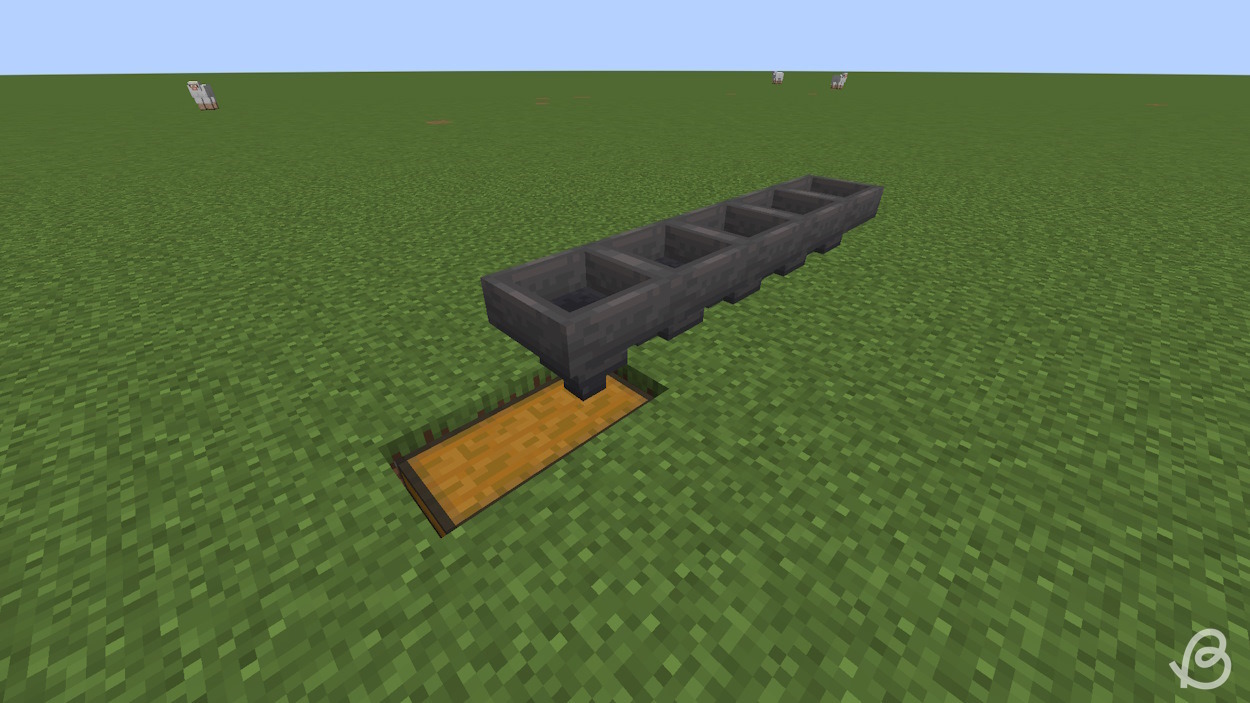
- Surround the hoppers and a chest with solid blocks.
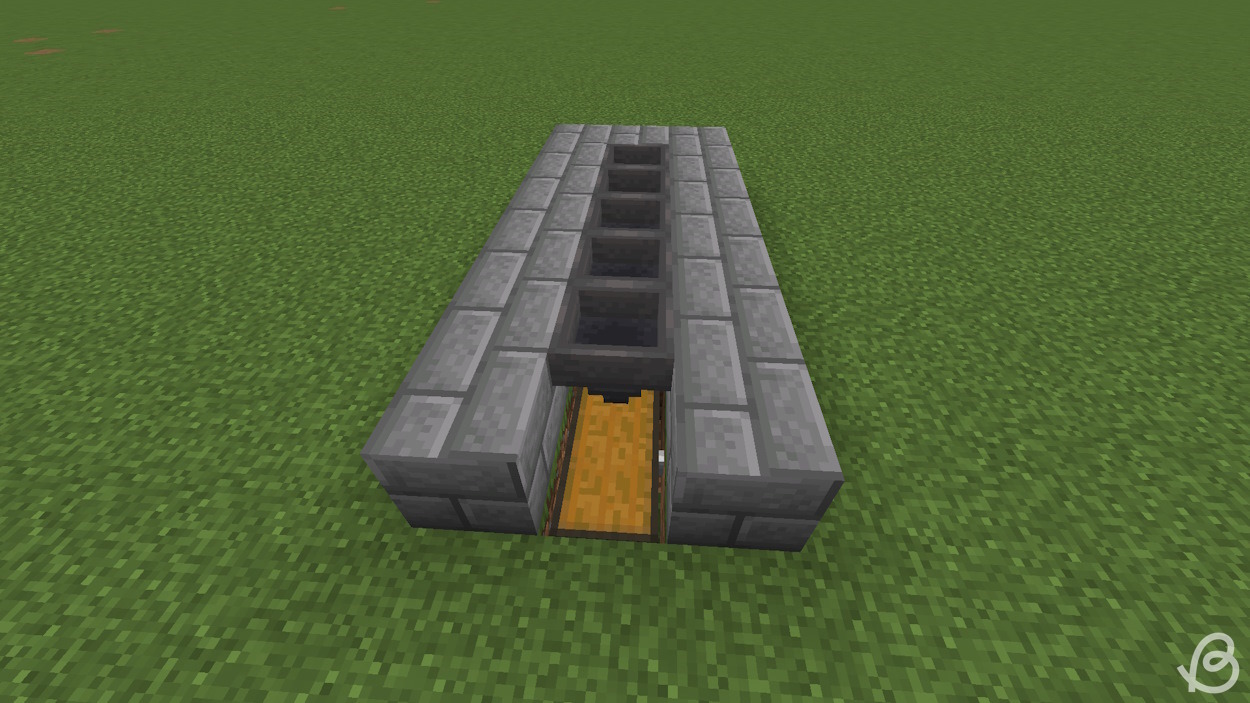
- Place five stairs on the solid blocks attached to the hoppers.
- Now, place solid blocks on top of all the solid blocks at the bottom.
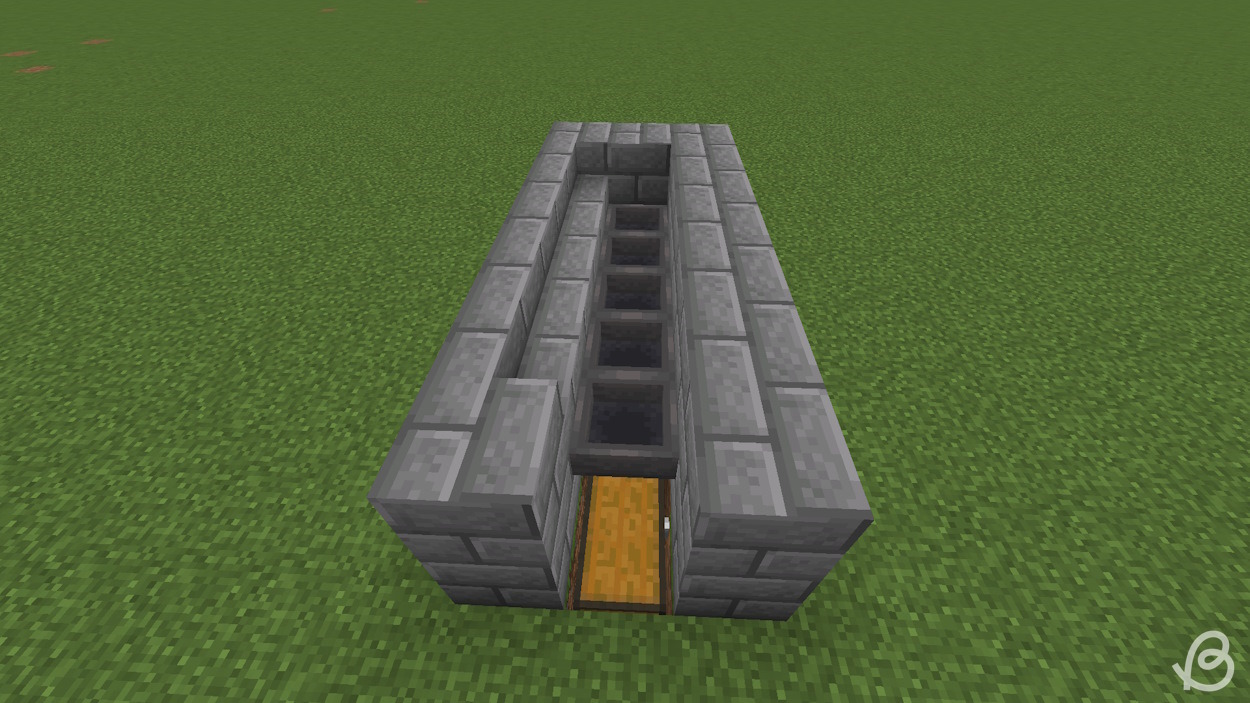
- Place a sign on the head level of the player on one solid block above the chest.
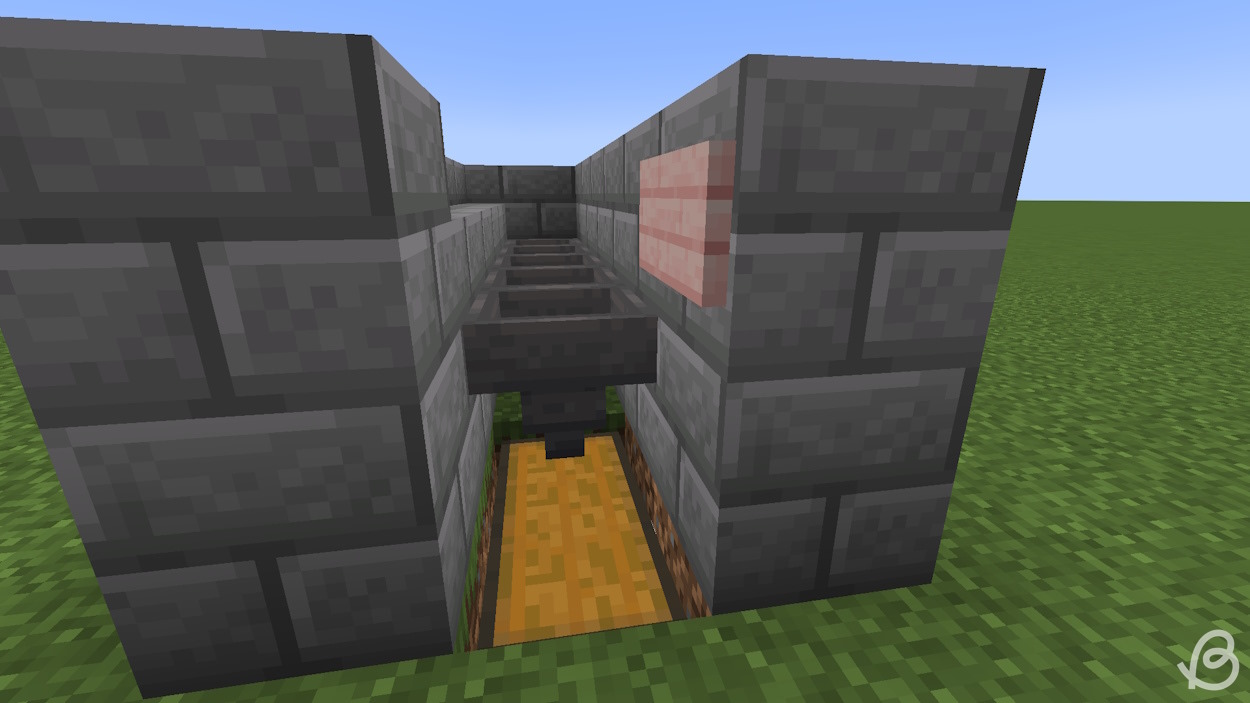
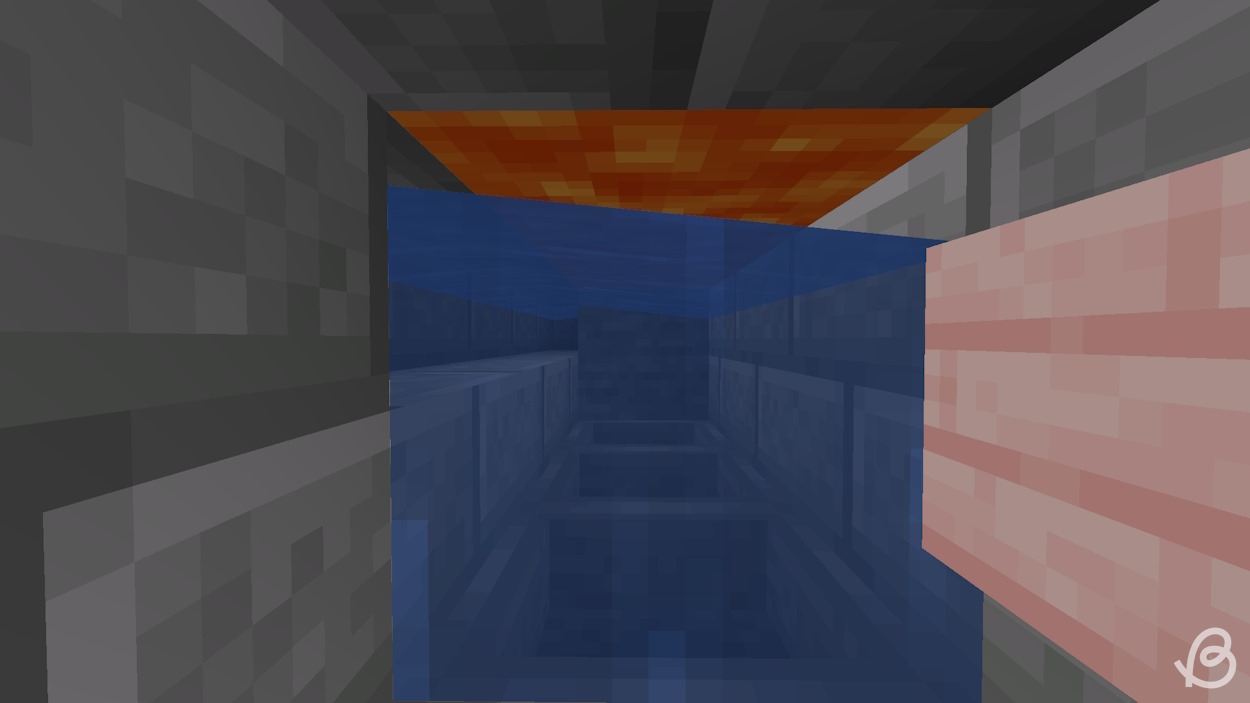
- Waterlog the stairs and place more solid blocks above the stairs, blocks, and a sign below for a third layer.
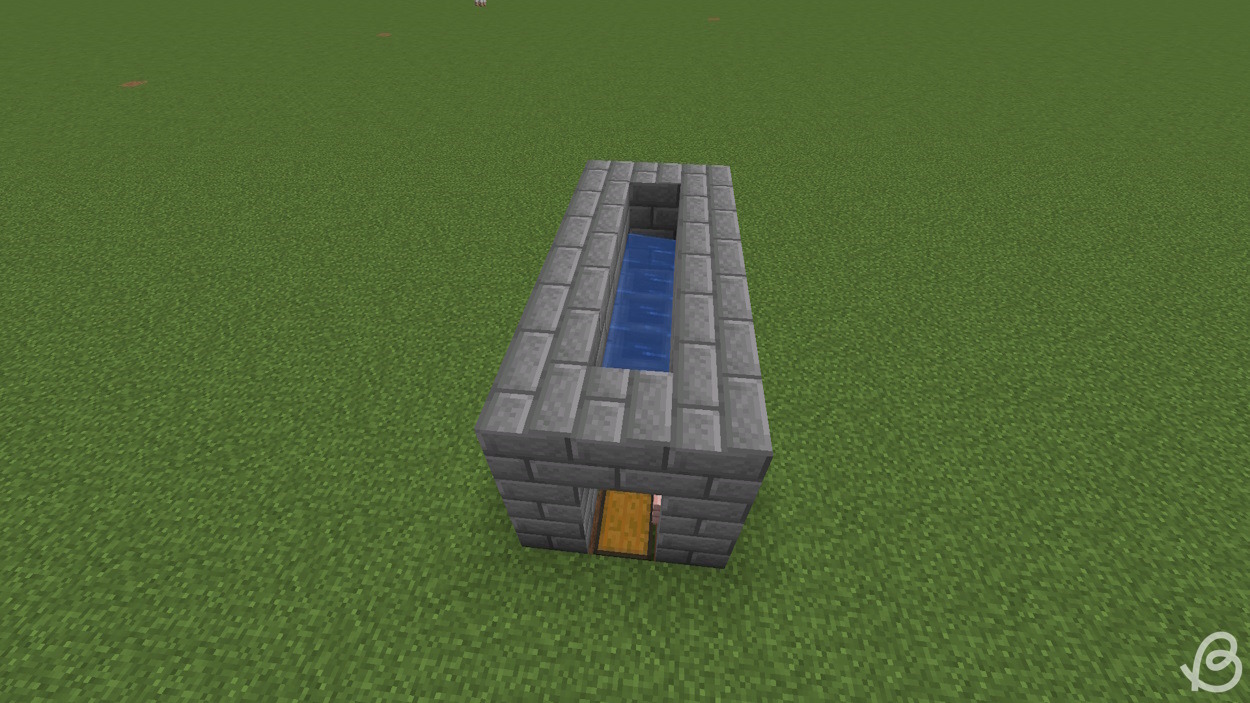
- Finally, place a lava bucket one block above the flowing water in the center.
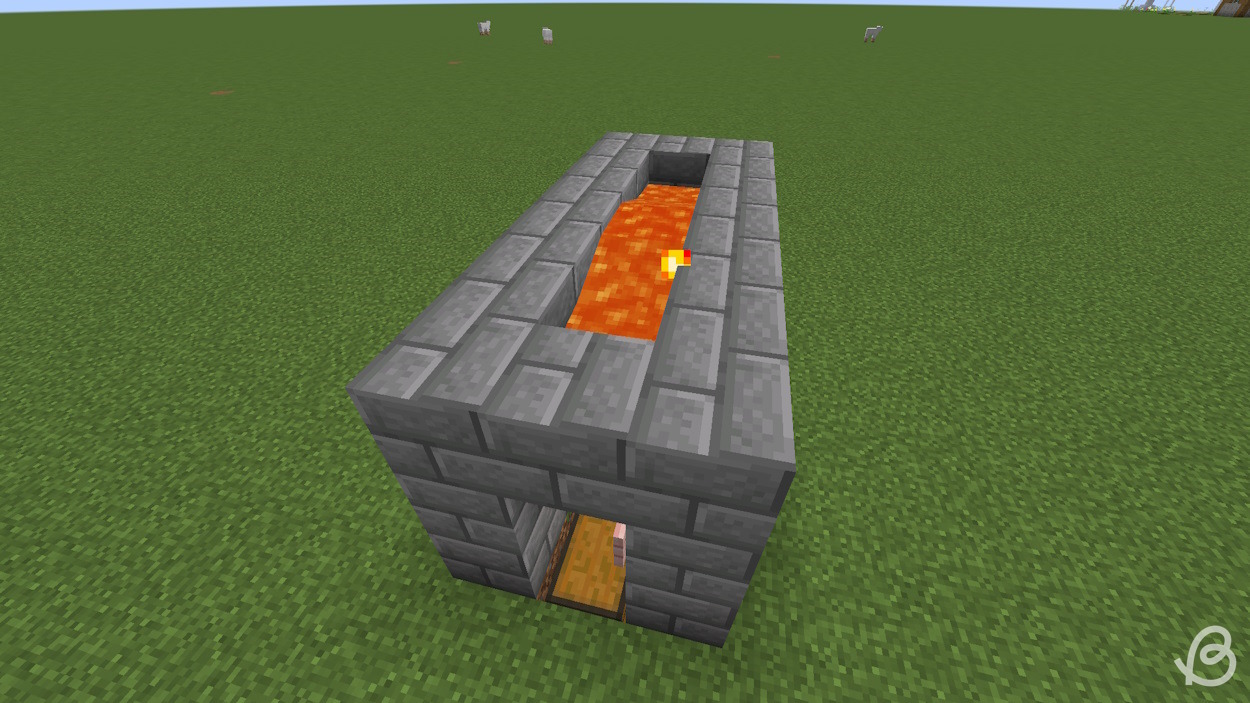
- You can now stand on the chest and keep breaking the stone blocks, which are continually generated. Then, you can break the stone block with a fortune-enchanted pickaxe.
Method 3: Piston-Based Cobblestone Generator
Now that we know and understand the basics of cobblestone and stone generators in Minecraft, let’s introduce a slightly more complex design. It consists of one or more cobblestone generators and the cobble is pushed toward the player using pistons. For this generator type, you’ll need the following items:
It’s up to you whether you want to build multiple modules. Here, we will show you how to build one module for your cobblestone farm:
- Place five stairs and surround them with solid blocks.
- Then, waterlog them all such that the water doesn’t spill everywhere.
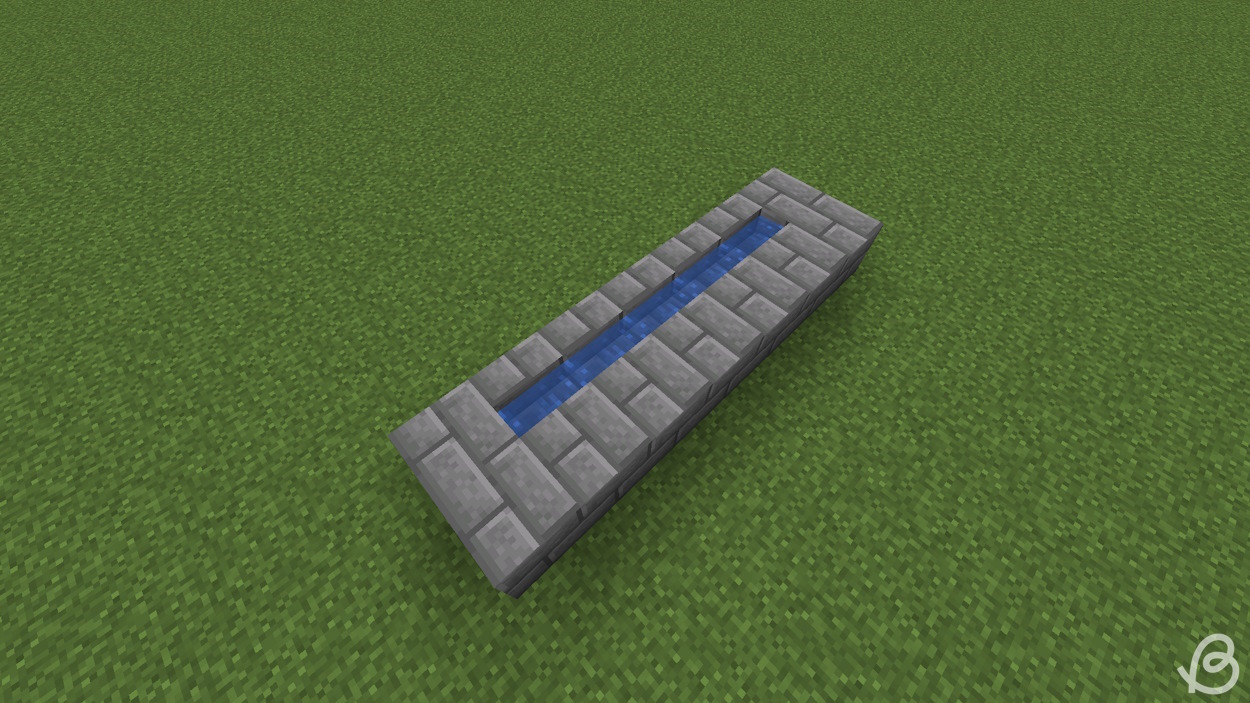
- Place solid blocks on top of the stairs and on the edges.
- Then, add two blocks on either end away from the stairs.
- After that, connect two ends with more solid blocks. This is a holding area for lava. It will flow down and when it touches waterlogged stairs, the cobblestone blocks will be generated.
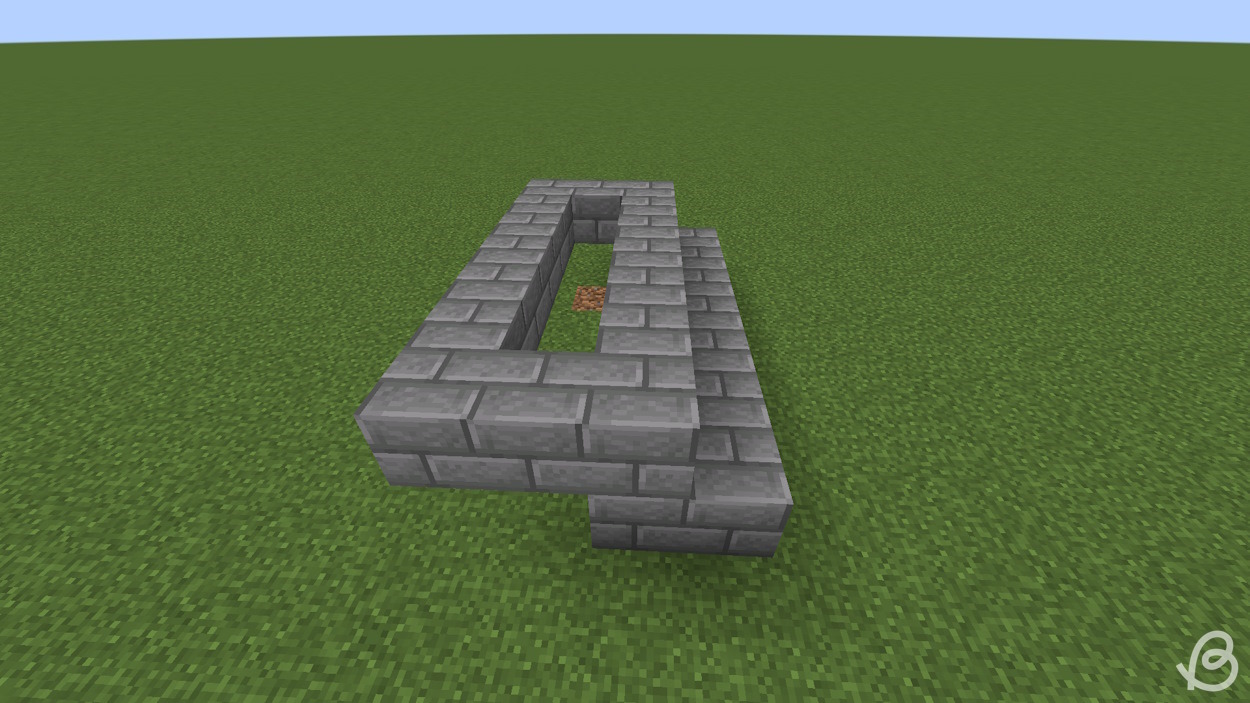
- Break a block diagonally downwards from a stair on one side and place a redstone torch in the hole.
- Then, place a piston diagonally upwards from the redstone torch looking towards it.
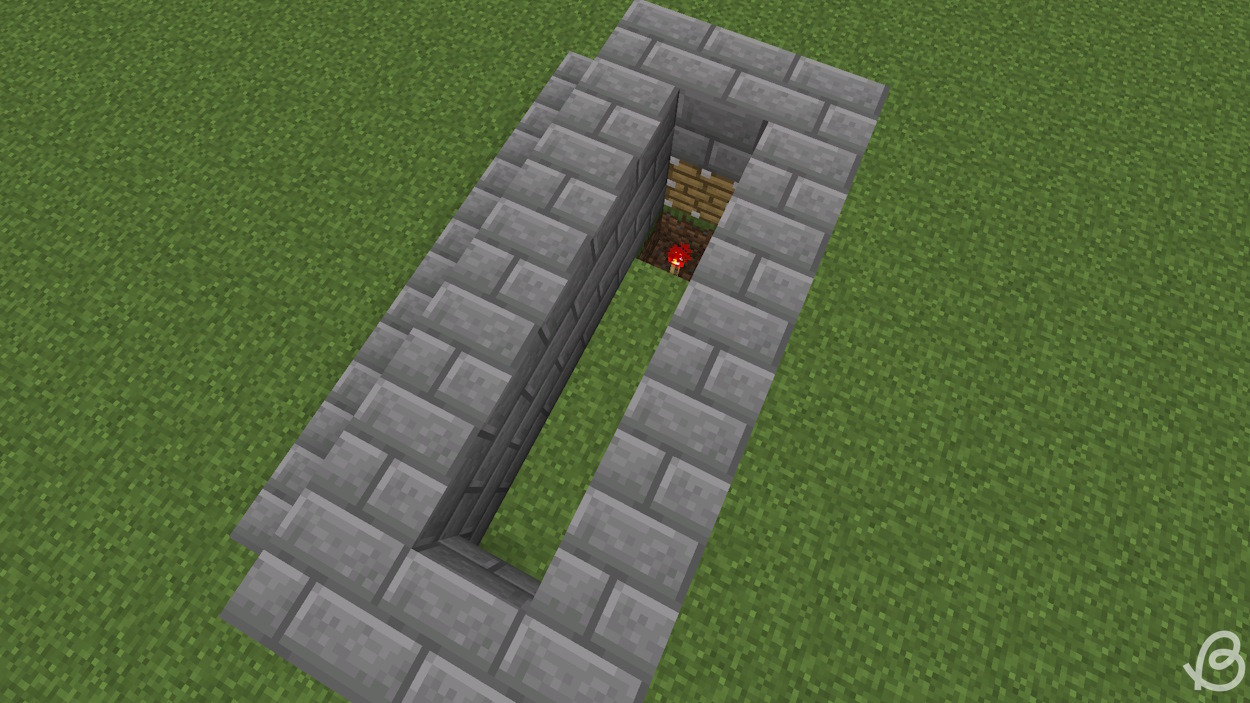
- After that, place a solid block attached to the piston and one redstone dust next to it. When a cobblestone block is generated attached to that piston, the signal from the redstone torch will be transmitted through the block and the piston will push it.
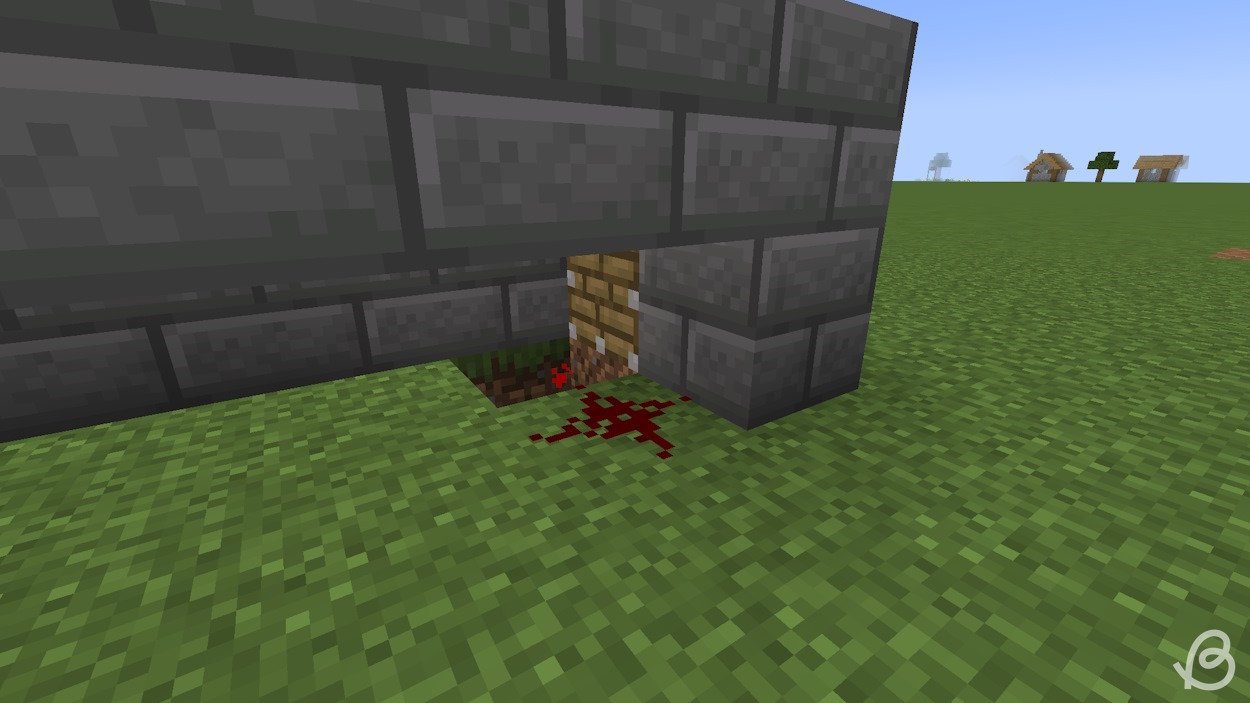
- Place 8 pistons in a row attached to the opposite side of the first piston.
- Also, place solid blocks behind them and put redstone dust over those.
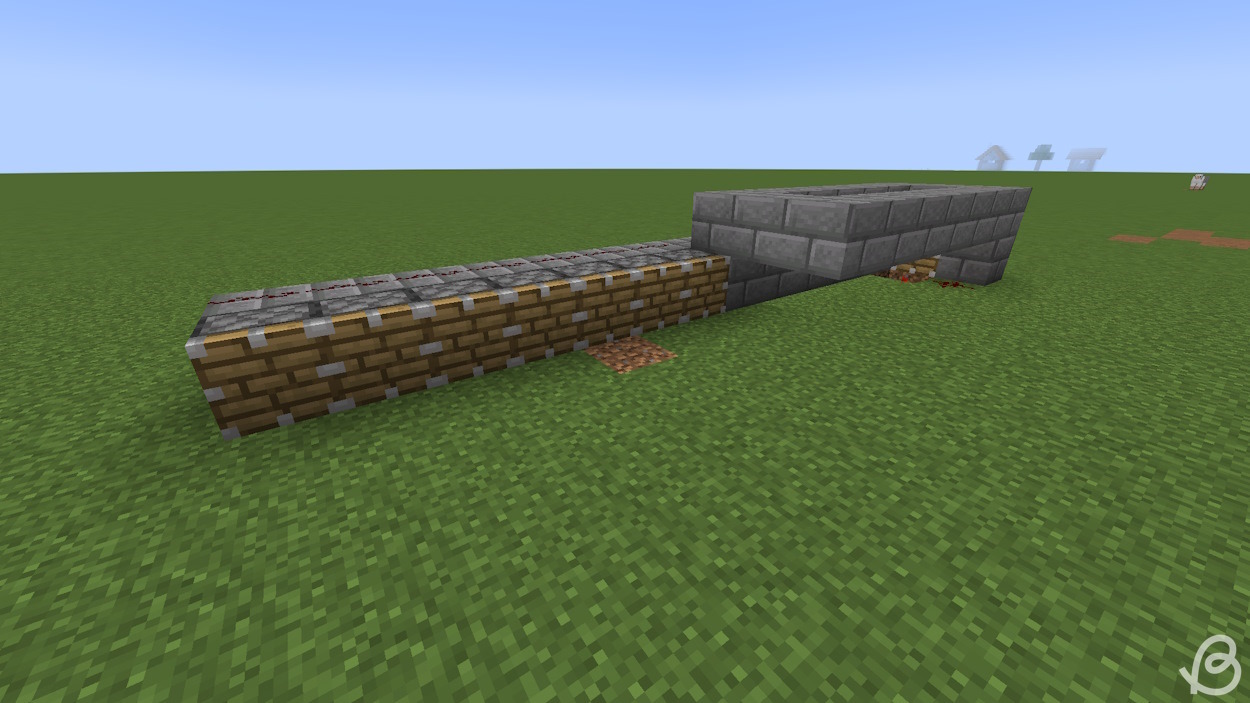
- Next, break a block diagonally downwards from the last piston and place a redstone torch in the hole.
- Place two more redstone dust from the redstone torch, followed by one redstone repeater, and two more redstone dust, connecting the redstone dust behind the pistons.
- When a cobblestone block arrives at the last piston, the signal will be transmitted and all seven pistons will fire simultaneously, pushing the cobblestone blocks.
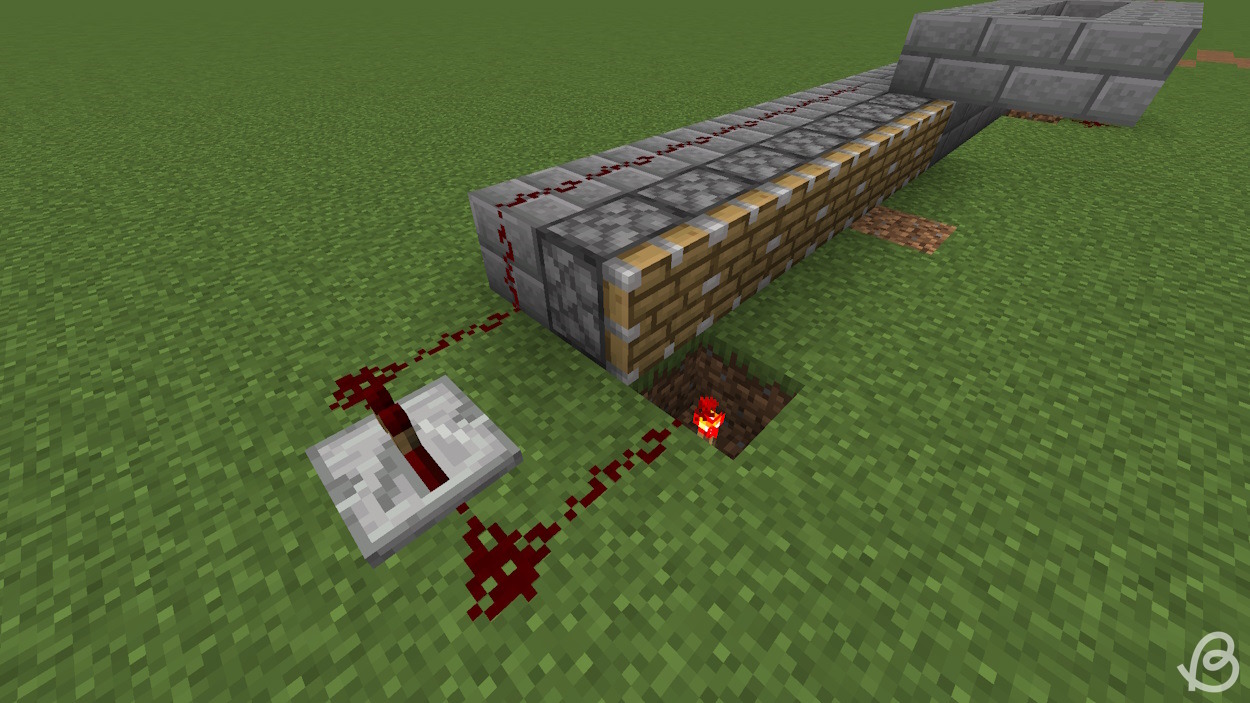
- Now, place lava one block above the first piston and in the center of the ring.
- Also, place the lever on the solid block attached to the first piston. The cobblestone will then start to generate, and the piston will push it towards other ones. You can then stand in one place and break the cobblestone blocks with a pickaxe.
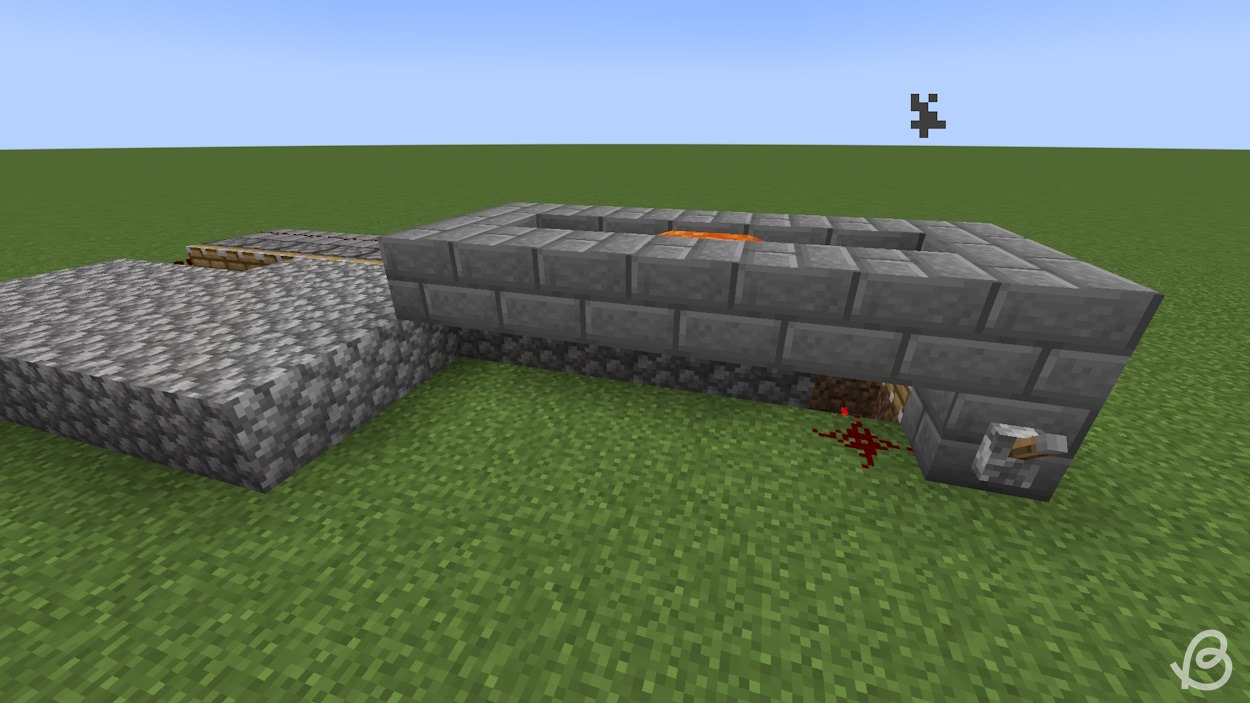
This design can be further improved if you add a collection system of some sort under the pushed cobblestone blocks. You could also create multiple modules around your standing position, so you can keep rotating and breaking even more cobblestones.
But you will soon realize this is a slow machine, but it works reliably. In order to stop the machine, just activate the lever, as it will permanently power the piston.
Method 4: Fully Automated Cobblestone Generator
For this final cobblestone generator design in Minecraft, we will use an even faster machine and also add a TNT duper to it. It’s a simple but powerful redstone machine that lets you duplicate TNT. You cannot get TNT in item form but only as primed entities.
We’ll also include a famous YouTuber Etho‘s hopper clock for it. With this design, you don’t have to mine the blocks manually, because the explosions will take care of them and you can just collect the drops. This design is a little more expensive than the other ones, but its going to do the job perfectly. Everything you’ll need is listed below:
- Water Buckets
- Lava Buckets
- Leaves (any and about 40 blocks)
- 7 Sticky Pistons
- 5 Pistons
- 5 Target Blocks
- 2 Observers
- 1 Block of Redstone
- 2 Redstone Comparators
- 3 Redstone Repeaters
- 6 Slime Blocks
- 1 TNT
- 1 Fence (any)
- 1 Dead Coral Fan
- 1 Detector Rail
- 1 Minecart
- 3 Fence Gates (any)
- Redstone Dust
- Solid Blocks
- Obsidian (about stack and a half)
- 2 Levers
- 2 Slabs (any)
- Chests
- Hoppers (at least 3)
- 1 Stair
Once you collect the long list of items listed above, follow the steps below:
- Place 5 regular pistons facing towards an area for a collection system.
- Then, place 5 leaves on those pistons and waterlog them. Unlike the previous design, water is contained with just a single leaf block.
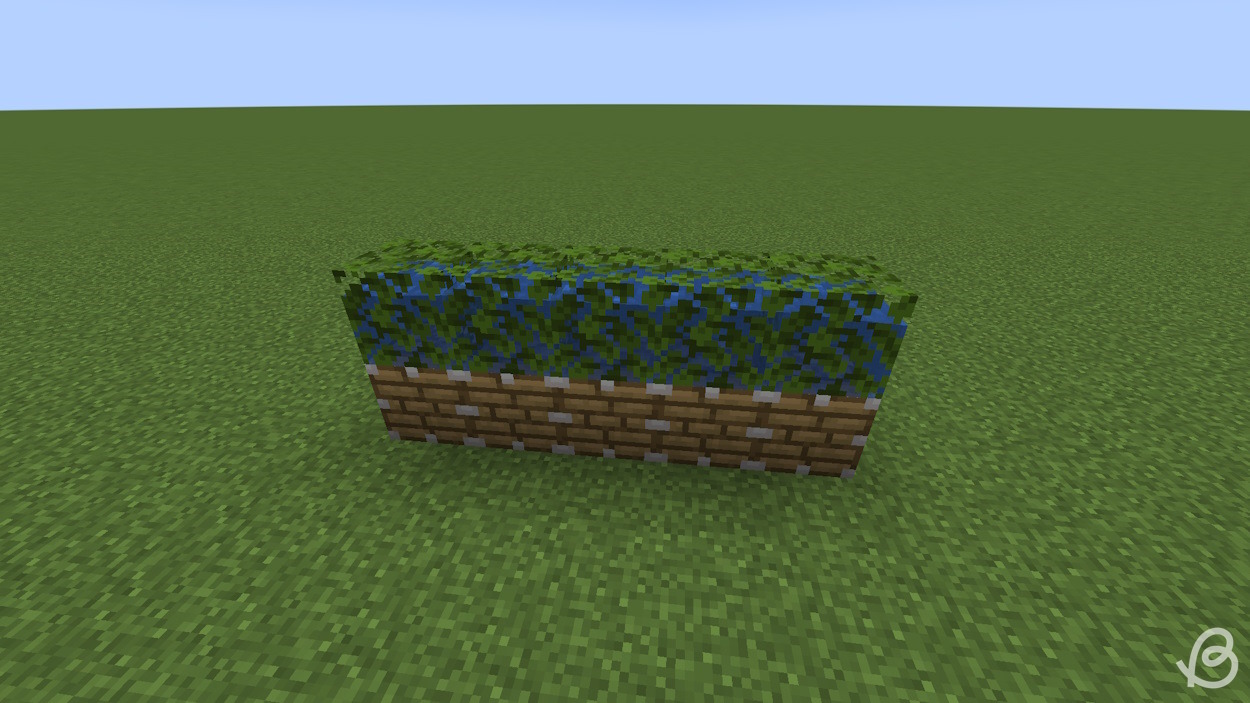
- Place solid inflammable blocks on those leaves and extend that line with one more block on either end.
- Then, create a one block wide ring towards the pistons. That’ll be the lava holding area.
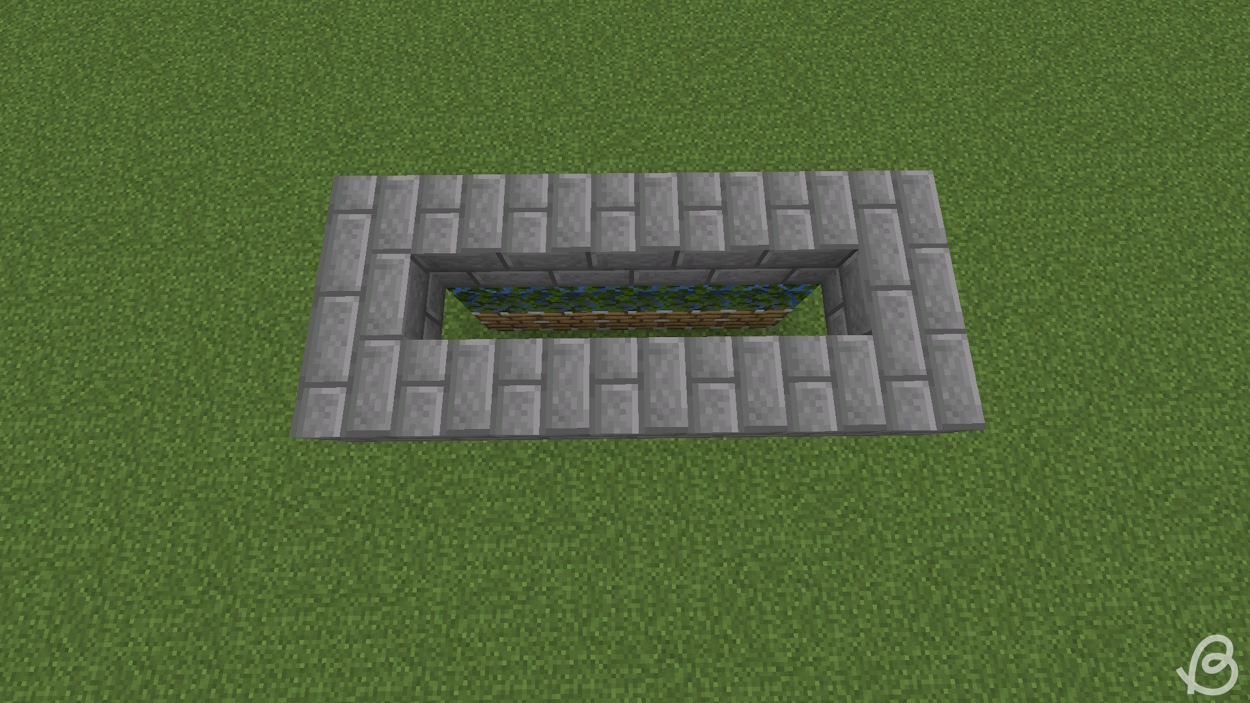
- Then, we’re going to place an observer on one end of the ring, one block below and in the center, looking towards the leaves.
- Also, put a solid block right behind the observer.
- The nest step is to place 5 sticky pistons diagonally downwards from the regular ones, facing up.
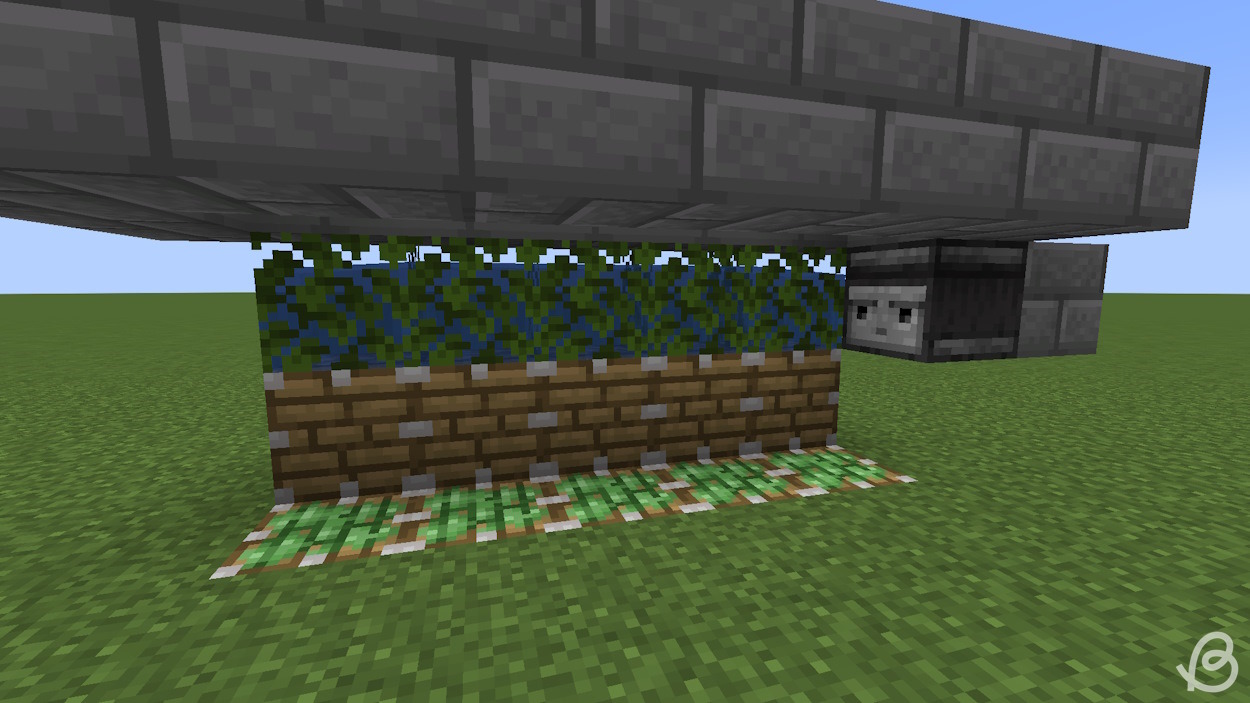
- Adjacent to those sticky pistons, dig out a 5 block long, one block wide hole and place the 5 target blocks in there.
- Then, right next to those target blocks, dig out a 6 block long, one block wide hole, starting from the edge opposite of the observer, and place redstone dust in it.
- Under the solid block the observer is attached to, place redstone dust and connect it with the redstone dust next to the target blocks.
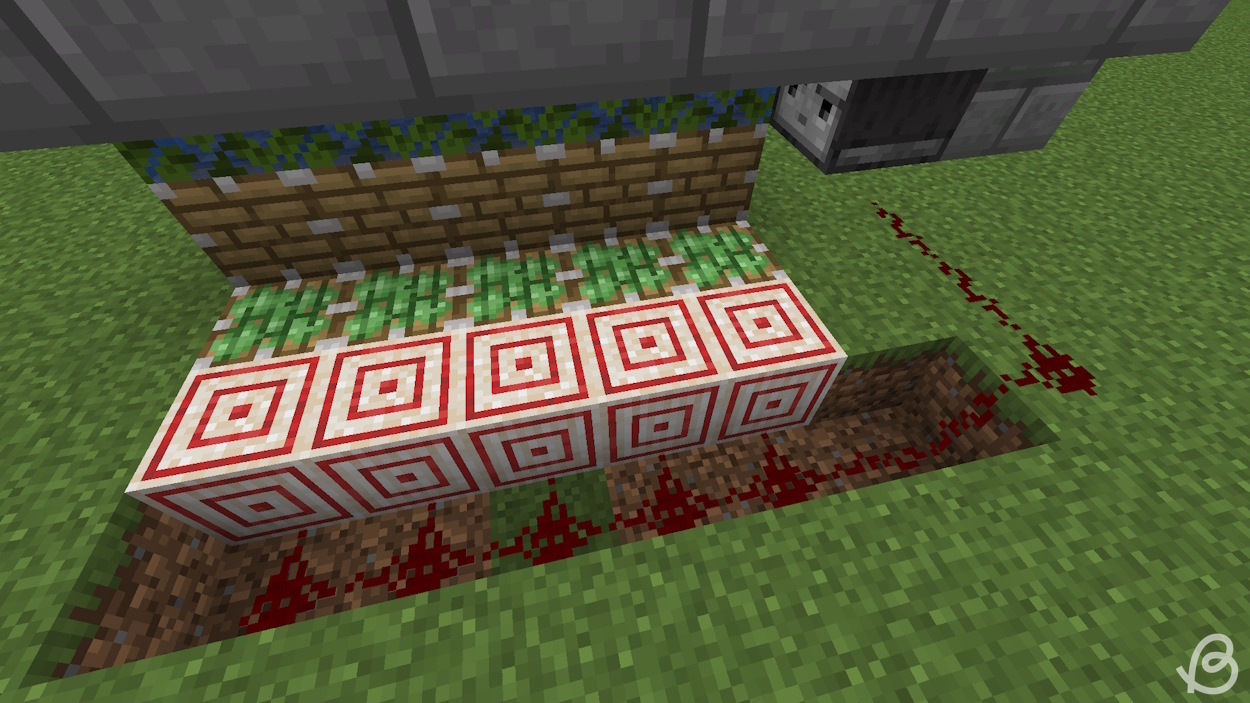
- Place solid blocks attached to the side of the regular pistons at the back of the generator.
- Also, place redstone dust on them and extend it with two more redstone dust towards the other redstone dust line.
- Then, connect two lines with a repeater facing toward the line behind the pistons and set it to two ticks (just right click it once).
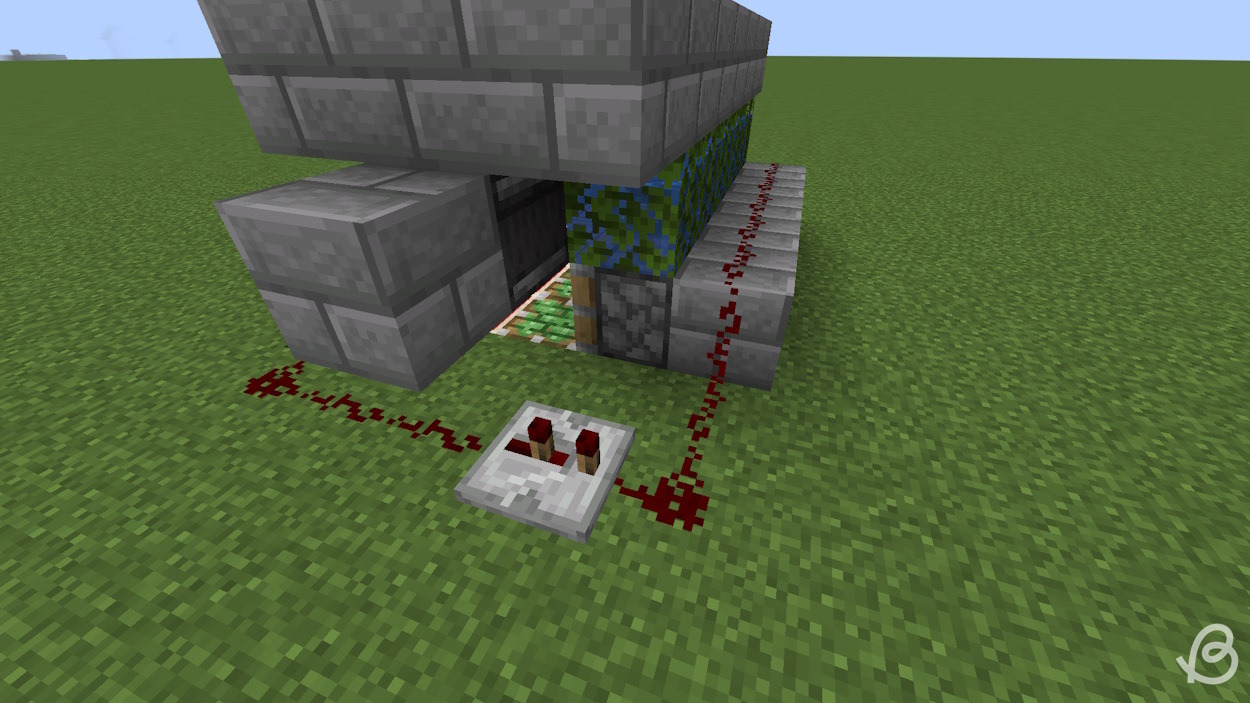
- Before we add the lava in the ring we created, we should have a way to disable the generator. You can do it simply if you place a lever attached to the redstone line before the repeater. This way, the sticky pistons will get powered and stop the farm. And if you turn off the lever, sticky pistons will fire again, triggering the observer and starting the generator. Finally, add lava and this Minecraft cobblestone generator will function.
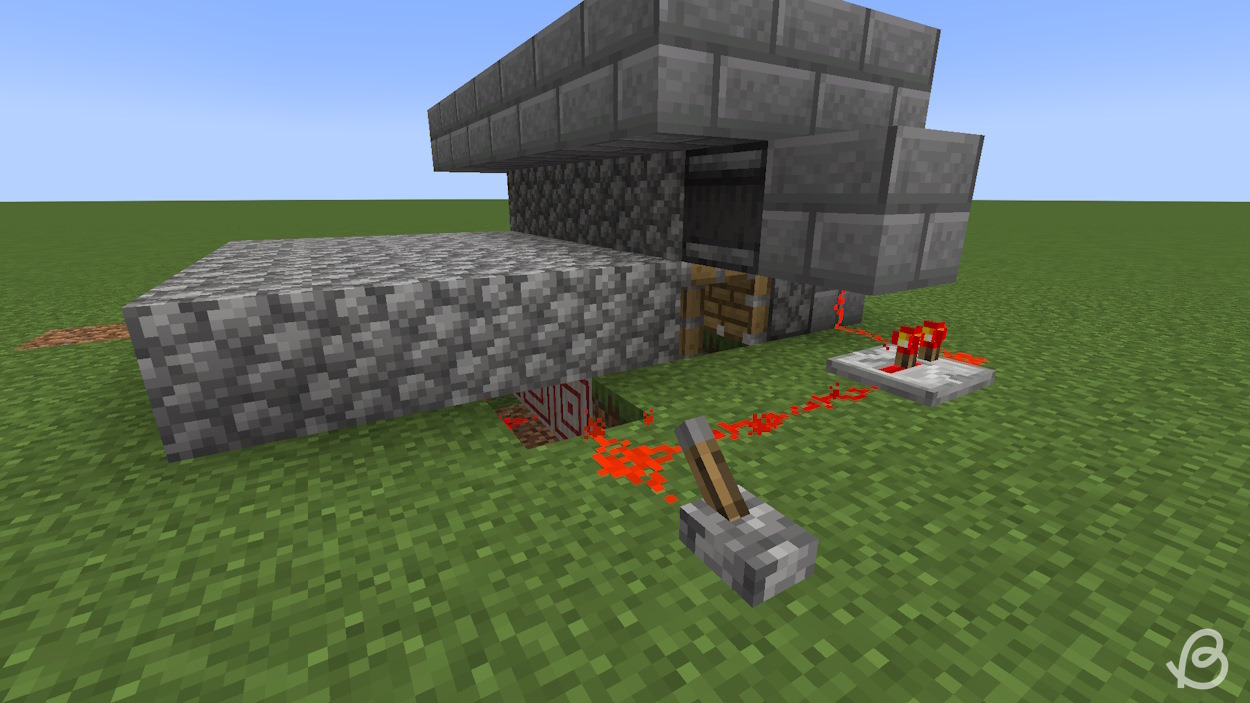
Now that we have a generator in place, let’s start building a simple TNT duper.
- Exactly 12 blocks from the center of regular pistons, place an obsidian block a couple blocks down. If you’ve build the generator on the surface, you’ll need to dig out a hole around the obsidian block. That hole should be pretty large, as the TNT explosions are quite destructive. We’ll be filling that hole with water for a collection system. Skip to the Collection System section below if you want to build it right away.
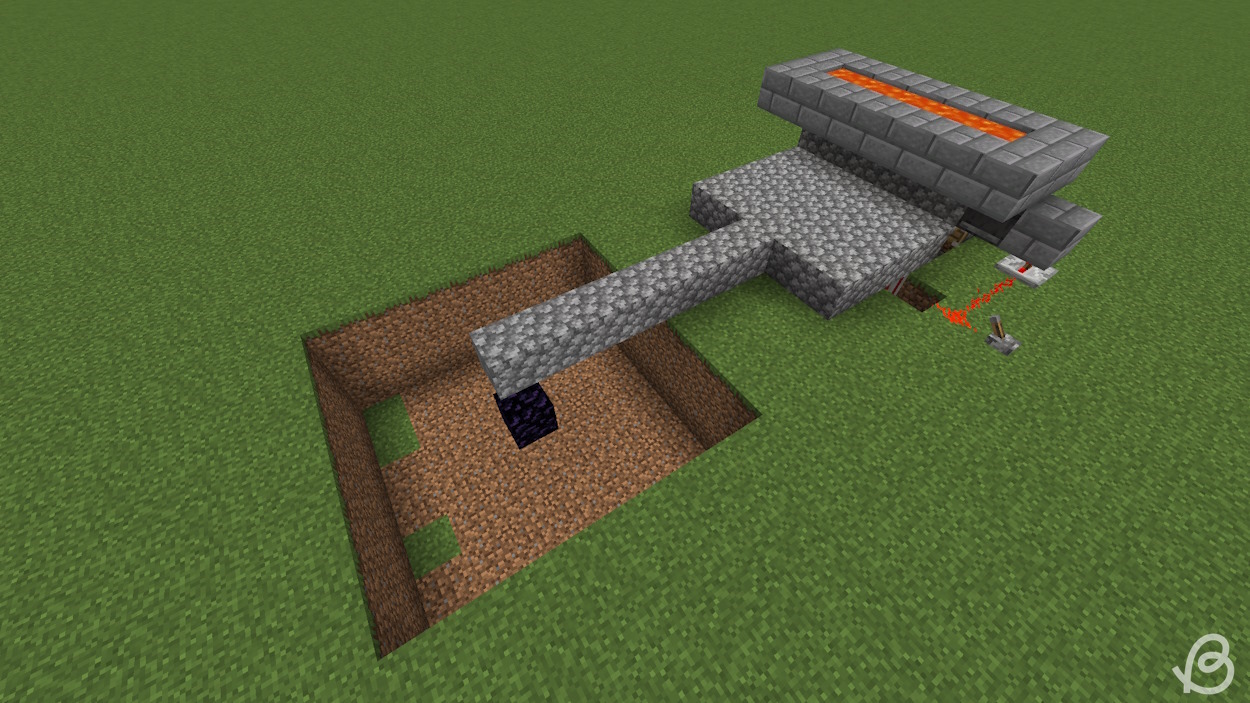
- From the obsidian block, pillar up 15 blocks. Diagonally upwards from the top block, place a slime block, then two more attached to it, creating an L shape.
- Also, put a fence attached to the topmost slime block, as shown in the picture.
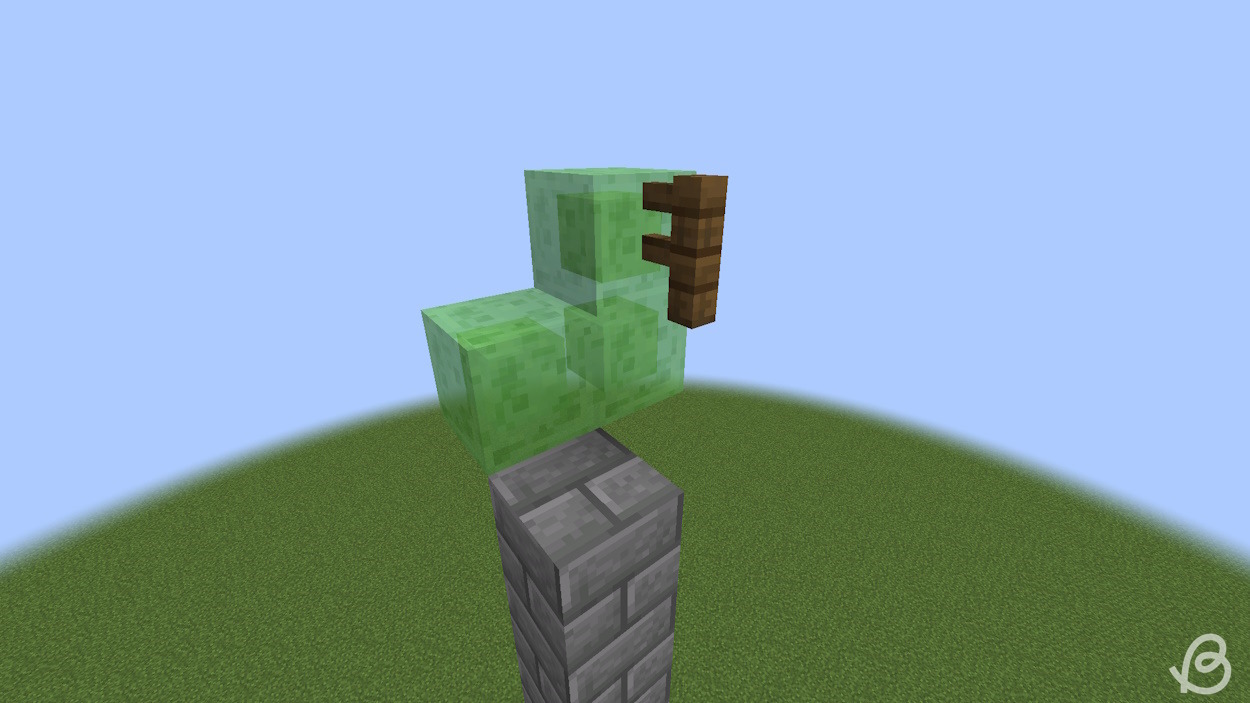
- Adjacent to the fence, place three more slime blocks creating an L shape as well.
- Then, place a detector rail on the slime block directly attached to the fence and a minecart on top of it.
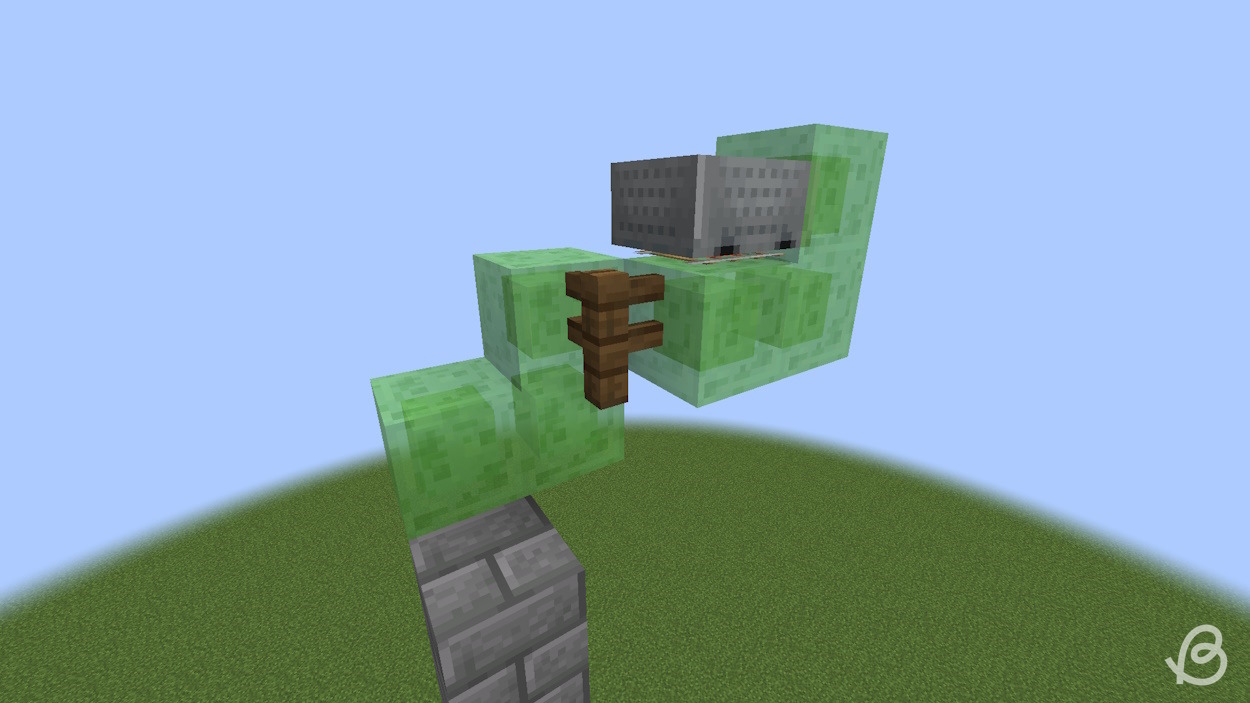
- Add a TNT block under the fence and place a dead coral fan attached to the slime block next to the TNT.
- Also add a sticky piston facing towards the rest of the TNT duper attached to the slime block next to the rail.
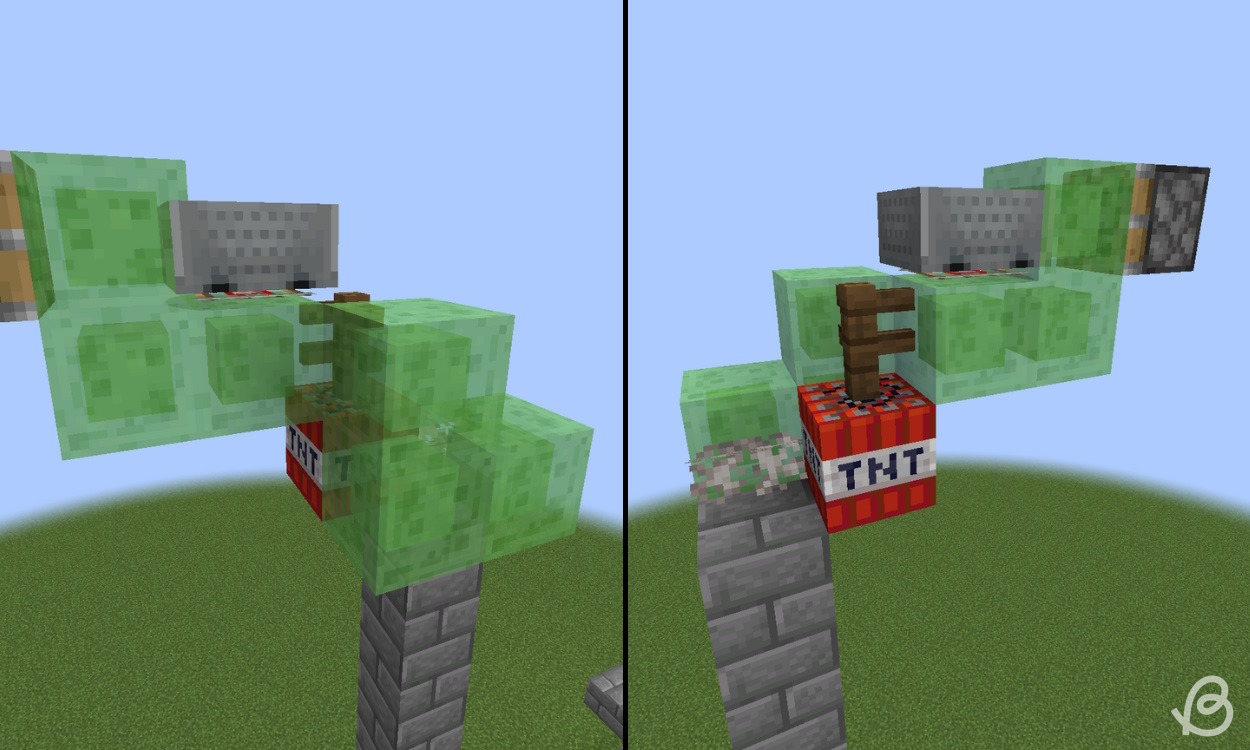
- Now let’s use the leaves and make a small water platform below for channeling the TNT where we want it. First, make a 5 x 5 vertical platform of leaves, with the top center block attached to the slime block one block below the one attached to the sticky piston.
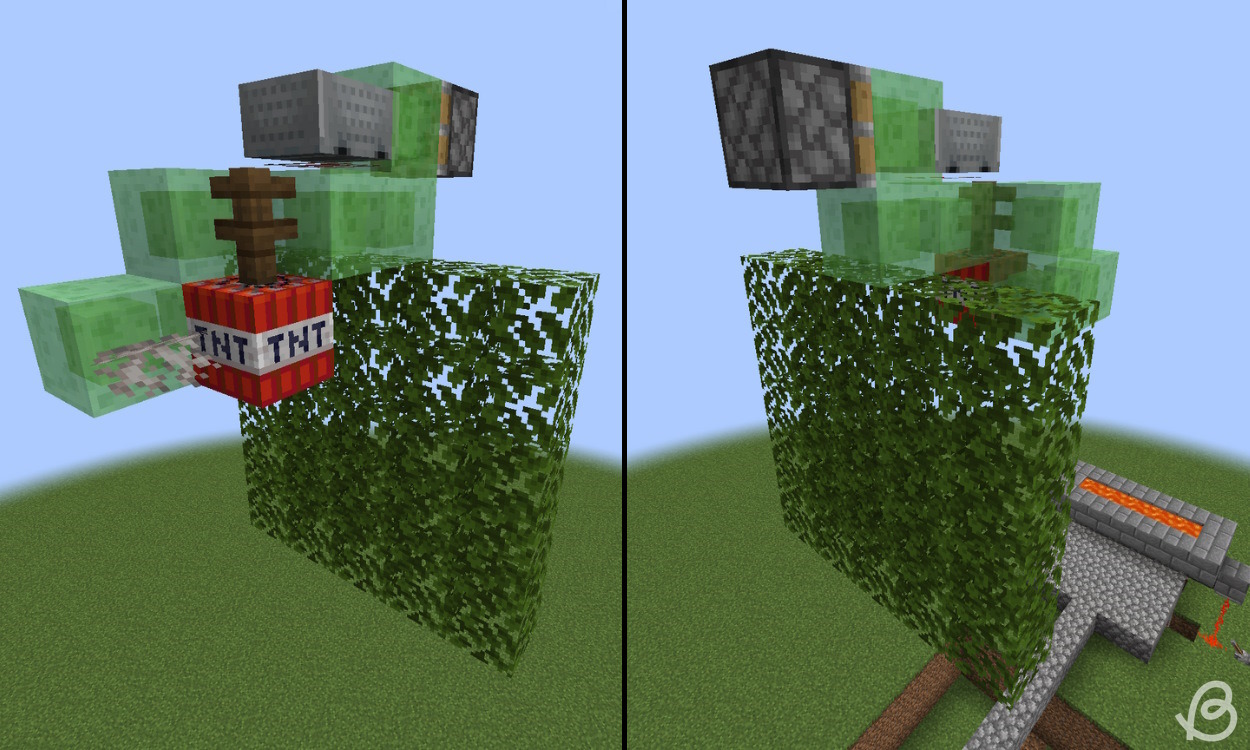
- Make a two block long, 5 block wide platform attached to the bottom center block of the leaf platform.
- Also add two more leaf blocks on either side, so the construction looks like a big leaf armchair.
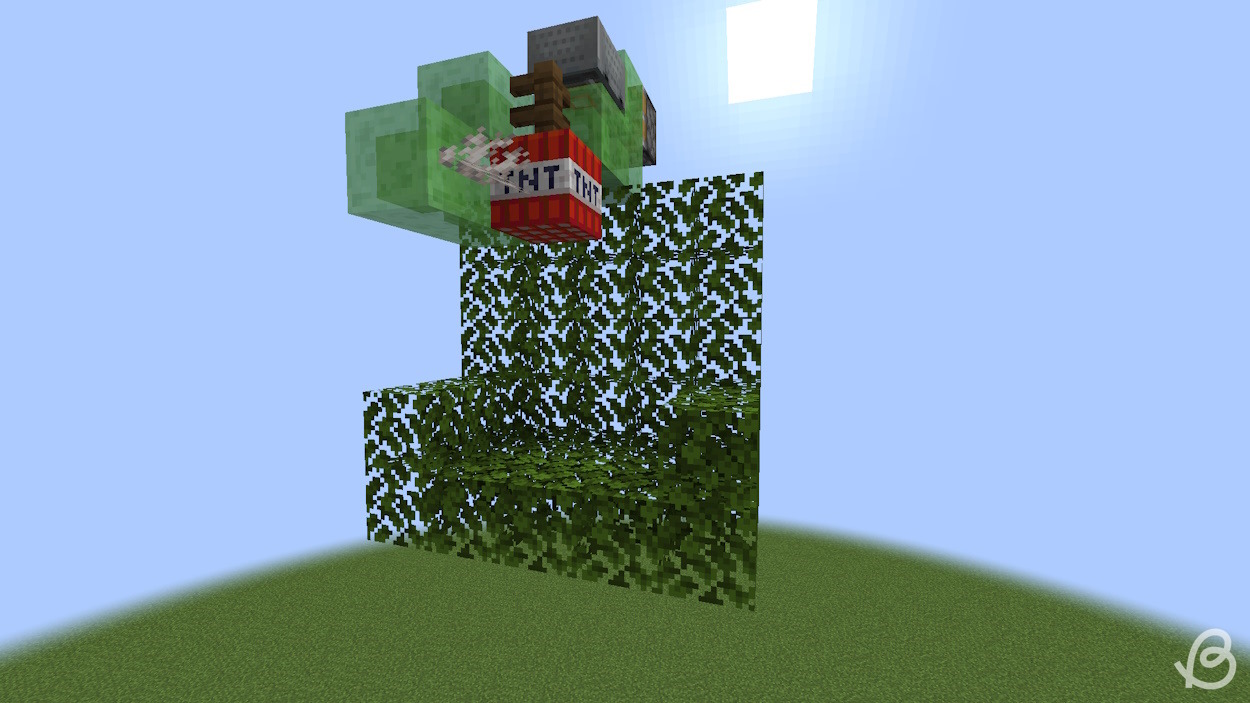
- Place three fence gates diagonally upwards from the edge of the leaf blocks, but not attached to any of them. They’re going to hold the water we’re placing in the corner of the leaf armchair, so the water flows towards the obsidian block below.
- It’ll be a bit tricky to place the water sources, so first remove those three leaves and place some other solid blocks there. After water is in place, replace those solid blocks with leaves again.
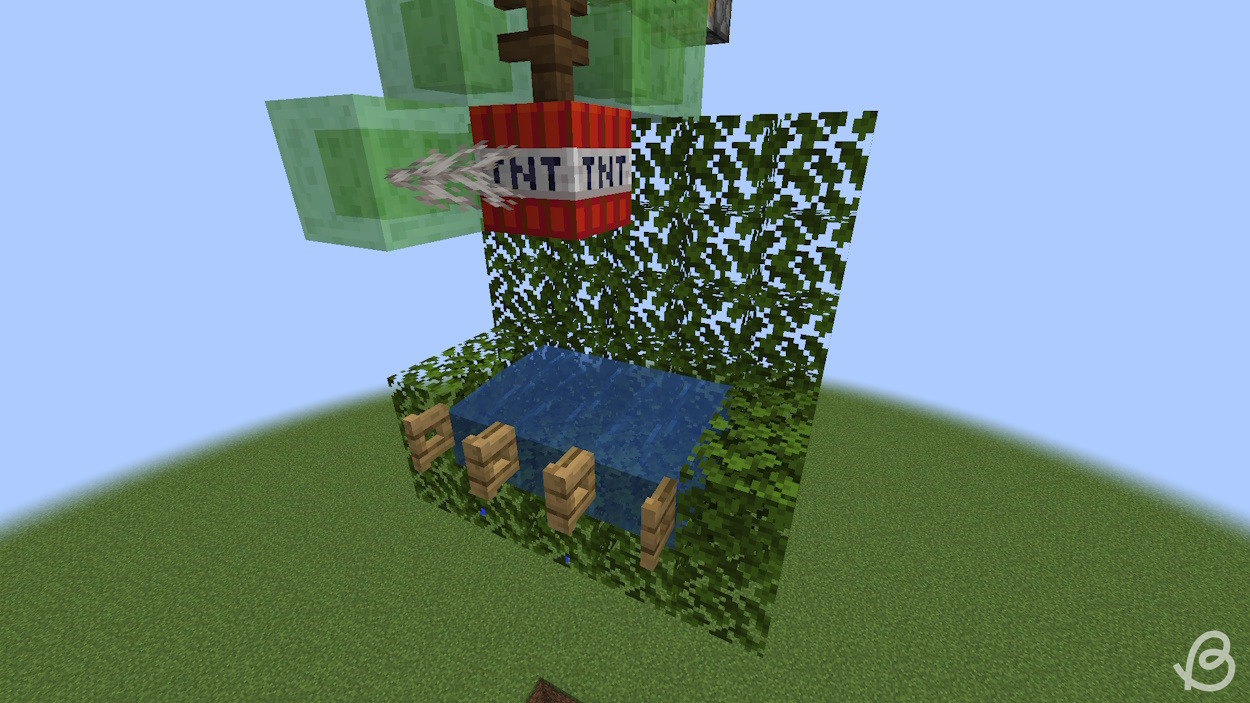
- Also, attached to the center fence gate, place a solid block. It’ll stop the TNT’s momentum and allow it to fall directly on the obsidian block. This big of a leaf construction is not necessary, but it’ll make sure the TNT is in place.
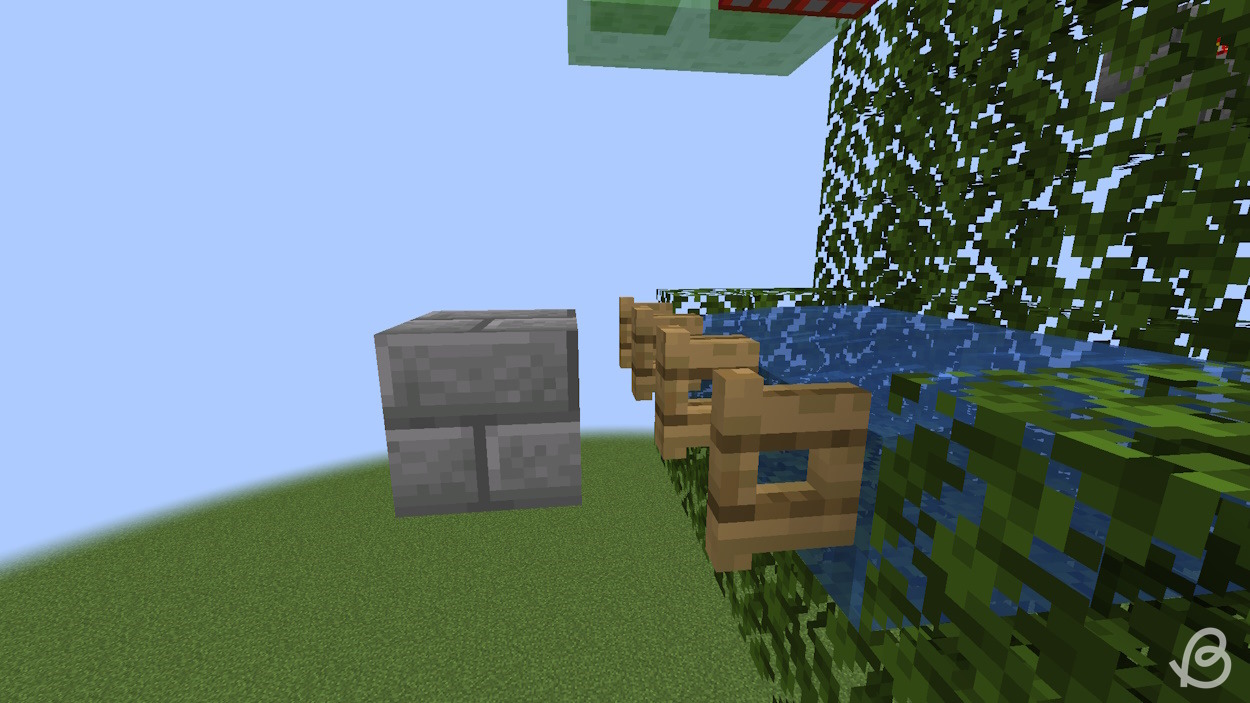
Now, we’re done with the TNT duper. Let’s jump straight into building an Etho hopper clock for it.
- First, place three solid blocks in a row attached to the TNT duper’s sticky piston.
- Break two that are closest to the sticky piston and place an observer facing into the third solid block. We did it this way, so we don’t accidentally trigger the TNT duper.
- You can then remove the solid block observer is attached to.
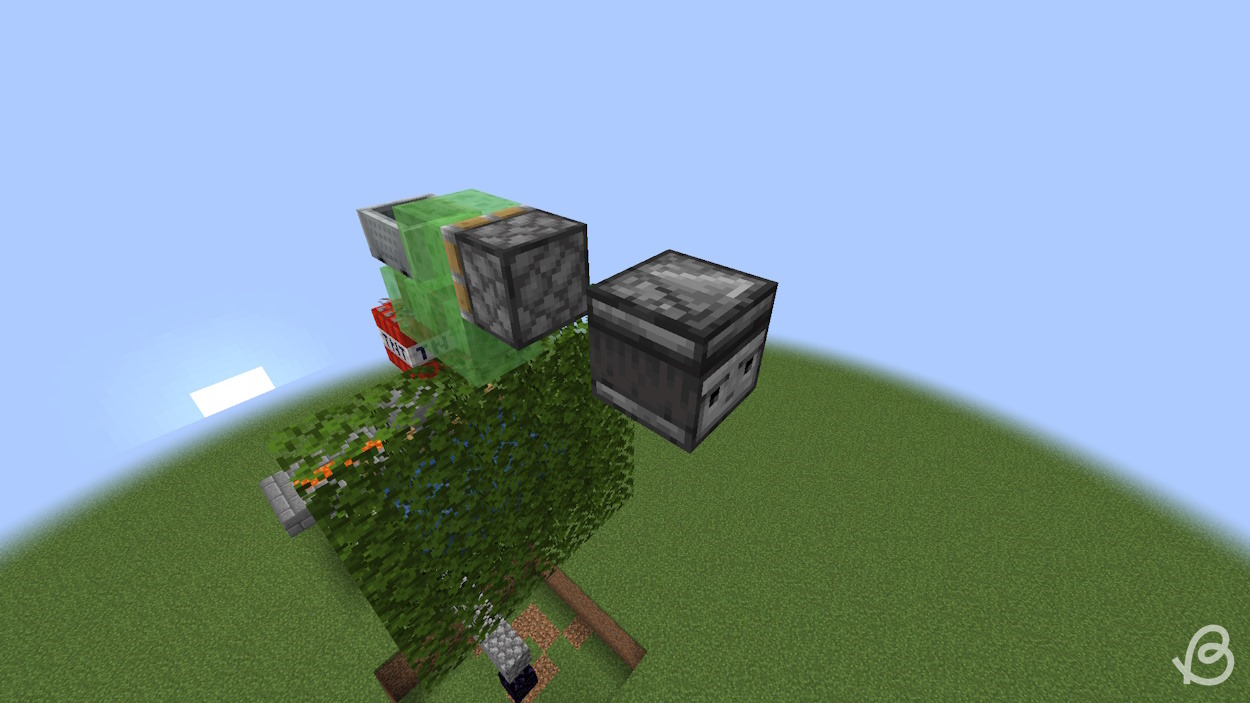
- Then diagonally downwards from the observer place two, this time permanent, solid blocks in a row.
- Then, adjacent to the last block, place two hoppers connected to each other.
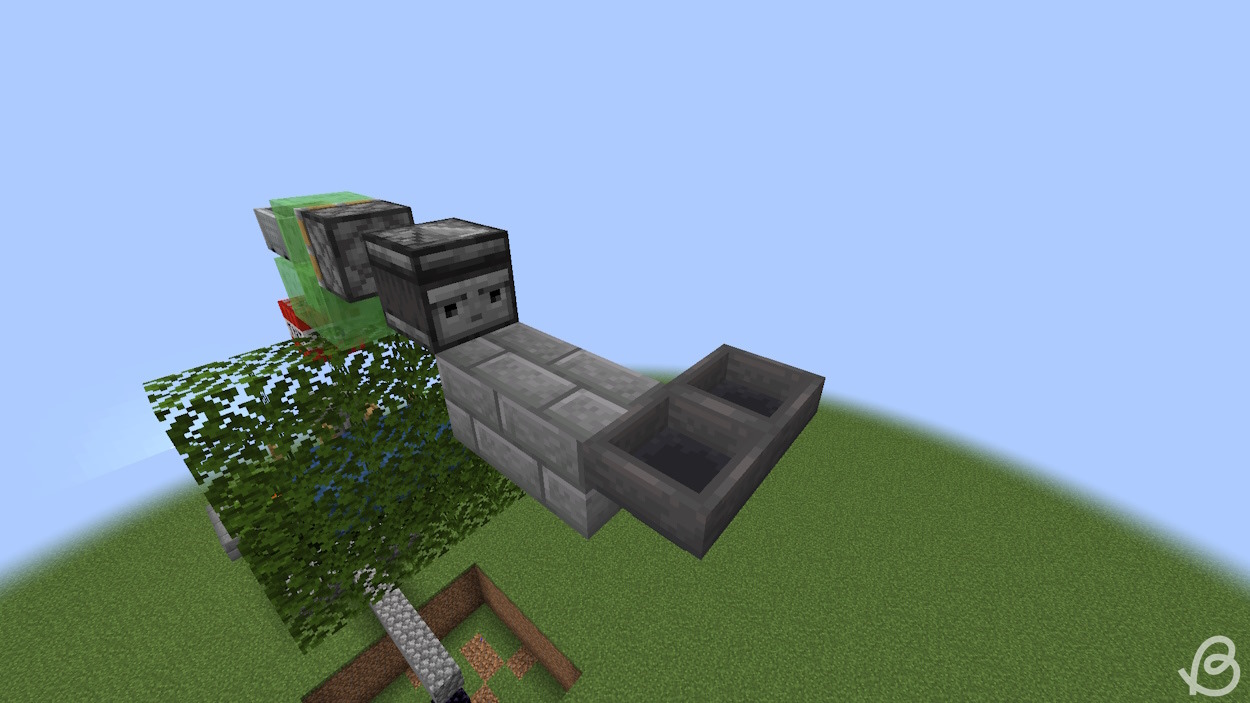
- Place two solid blocks diagonally downwards from one hopper.
- Place a redstone comparator on the one closer to the hopper, reading its contents and place a redstone repeater on the other one.
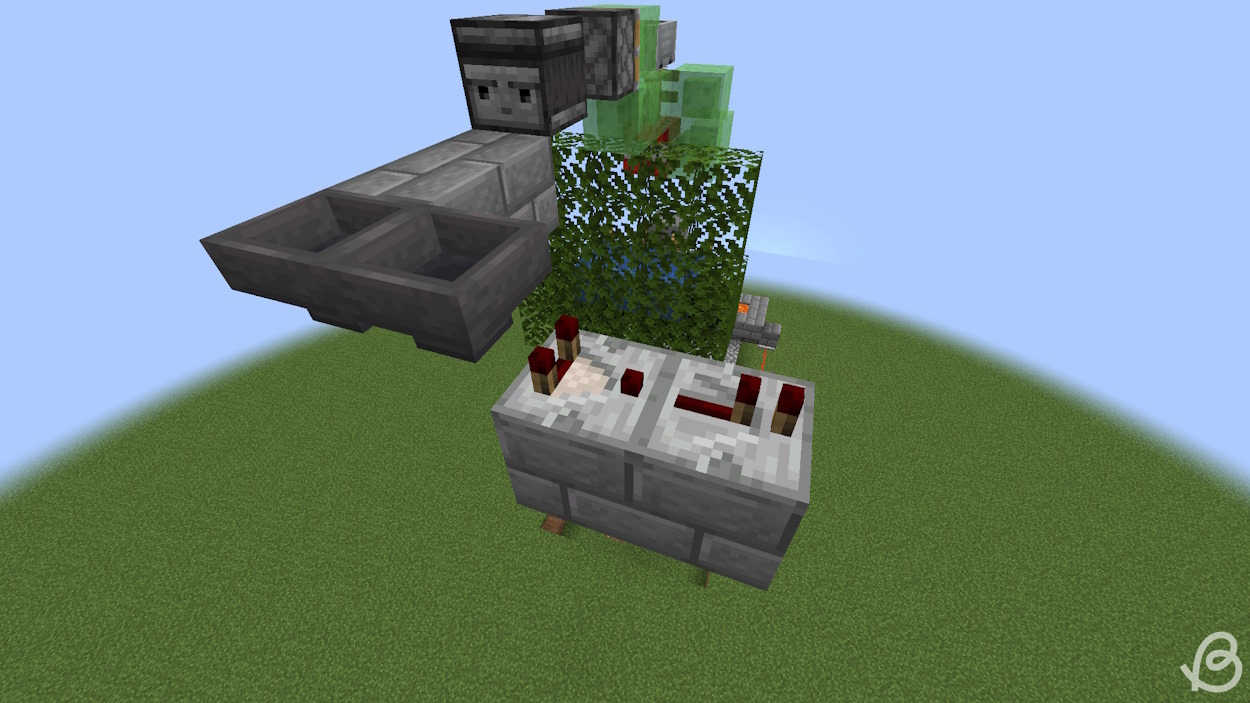
- Then, place a solid block attached to the repeater with a redstone dust on top.
- Attached to that redstone dust, place a top-half slab only and add a redstone dust to it. Attach a sticky piston to that slab facing the hoppers.
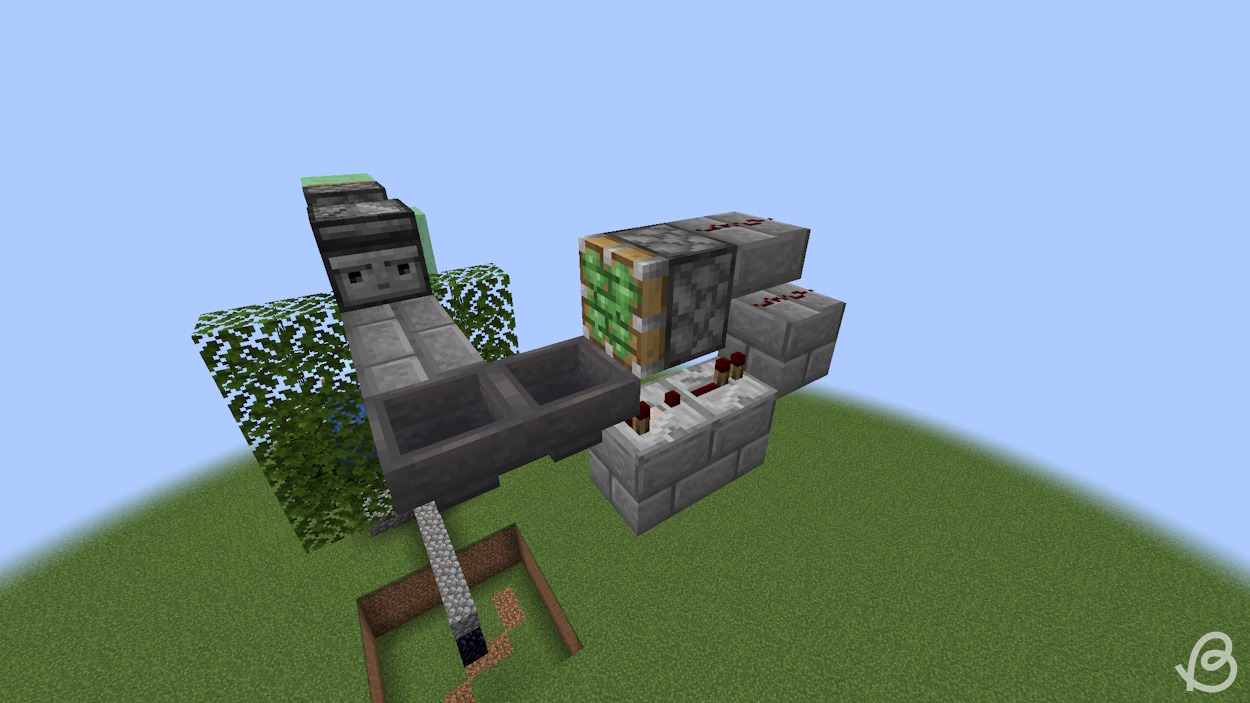
- Now repeat the same thing on the other side and put a redstone block on one hopper.
- Fill the other hopper with exactly 4 items (any, you can use sticks). This will make the clock switch rather quickly and it’s the perfect timing for priming TNT as soon as possible.
- Also, add two redstone dust between the observer and the hopper clock.
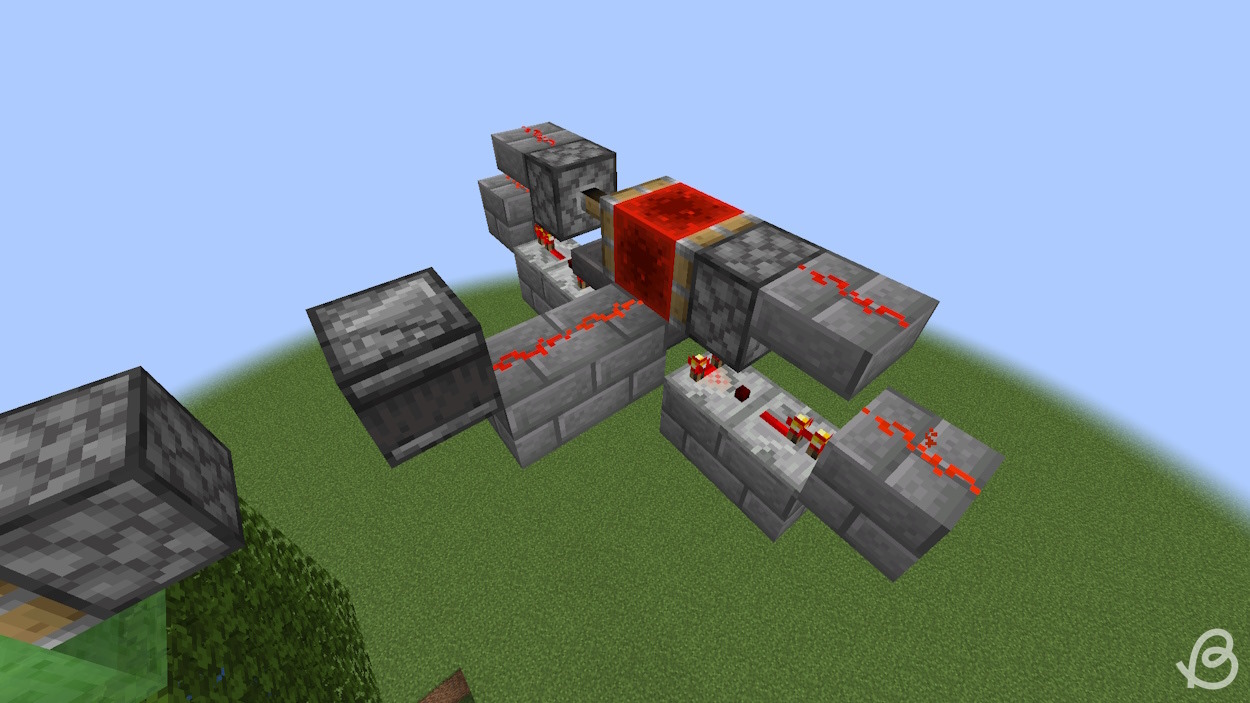
- Before placing the final block, let’s cover how to turn off the hopper clock and TNT duper. You can do this easily by powering the redstone dust, the observer is facing towards.
- Place a lever attached to that block or create a master switch, which will activate the generator and the TNT duper. You can just connect the two redstone lines with some more redstone dust.
- You can also use redstone torch towers or even calibrated sculk sensor to transmit the signal wirelessly. After you know how to disable the duper, you can place the last solid block between the observer and the sticky piston.
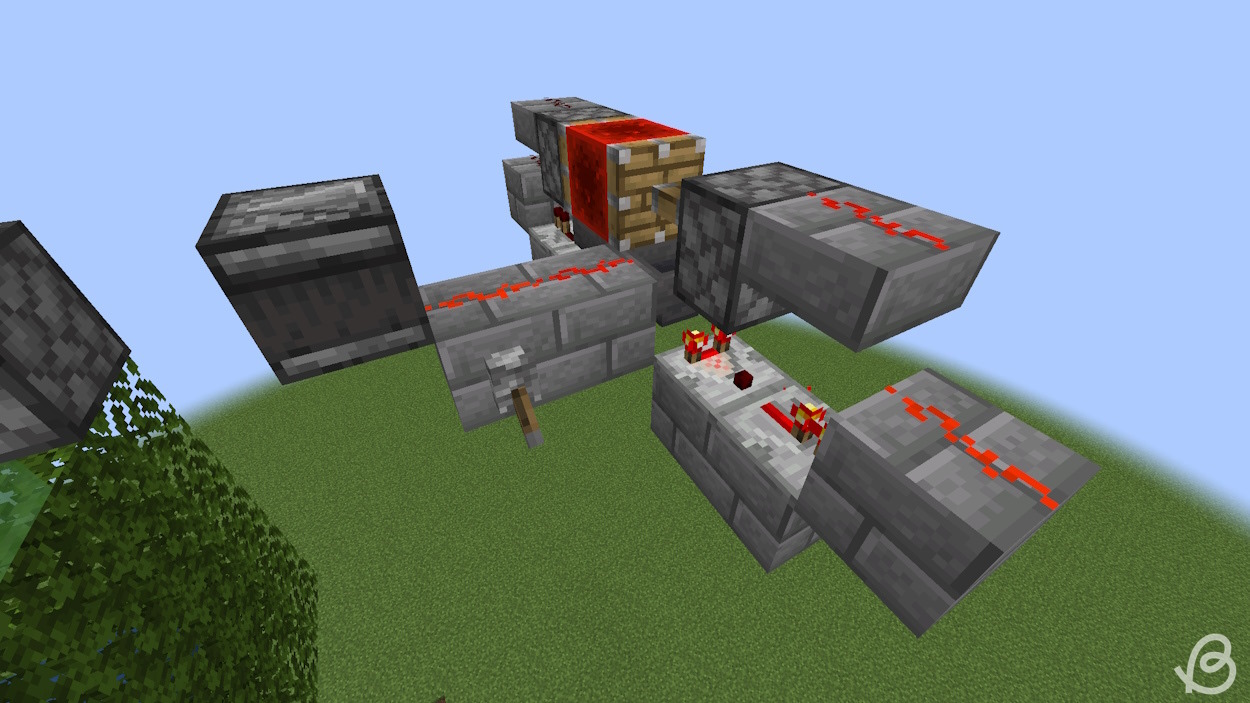
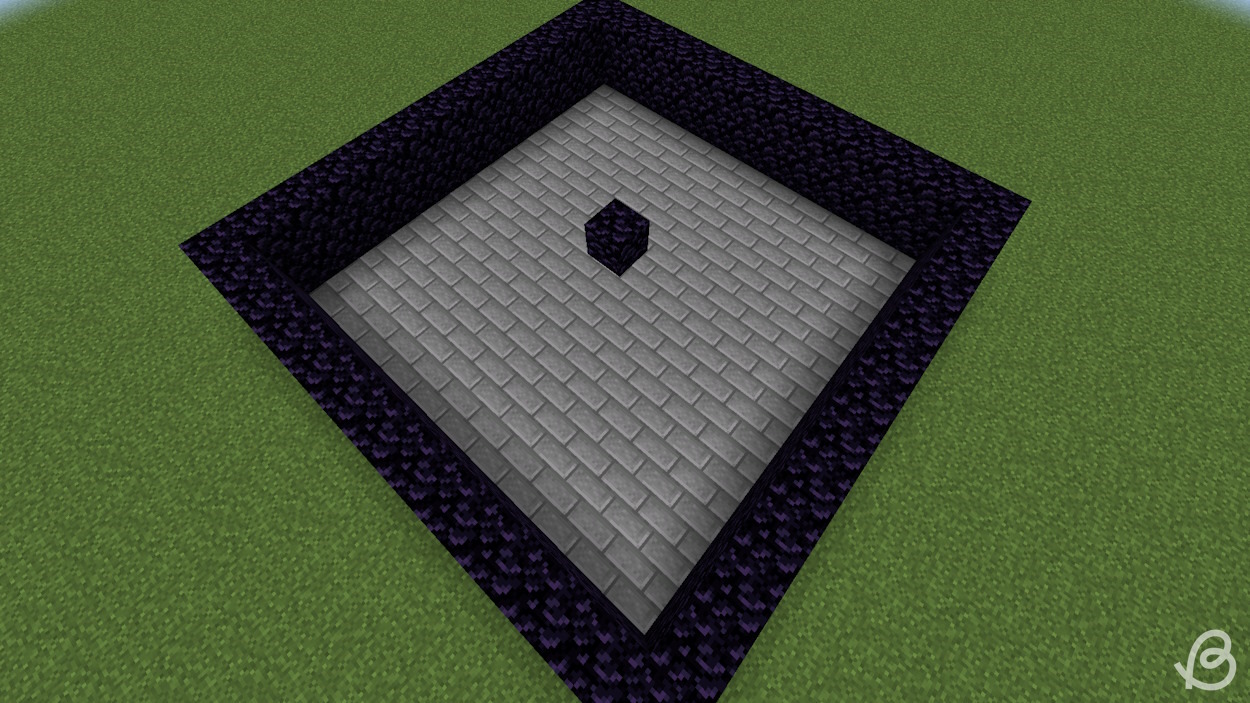
- Under the obsidian block, create a 11 x 11 block platform and surround it with two block tall obsidian wall to keep the explosions from destroying any more terrain.
- Place two block wide and 11 block long platform along the bottom of the platform on the side closest to the generator. Then place the water along the obsidian wall.
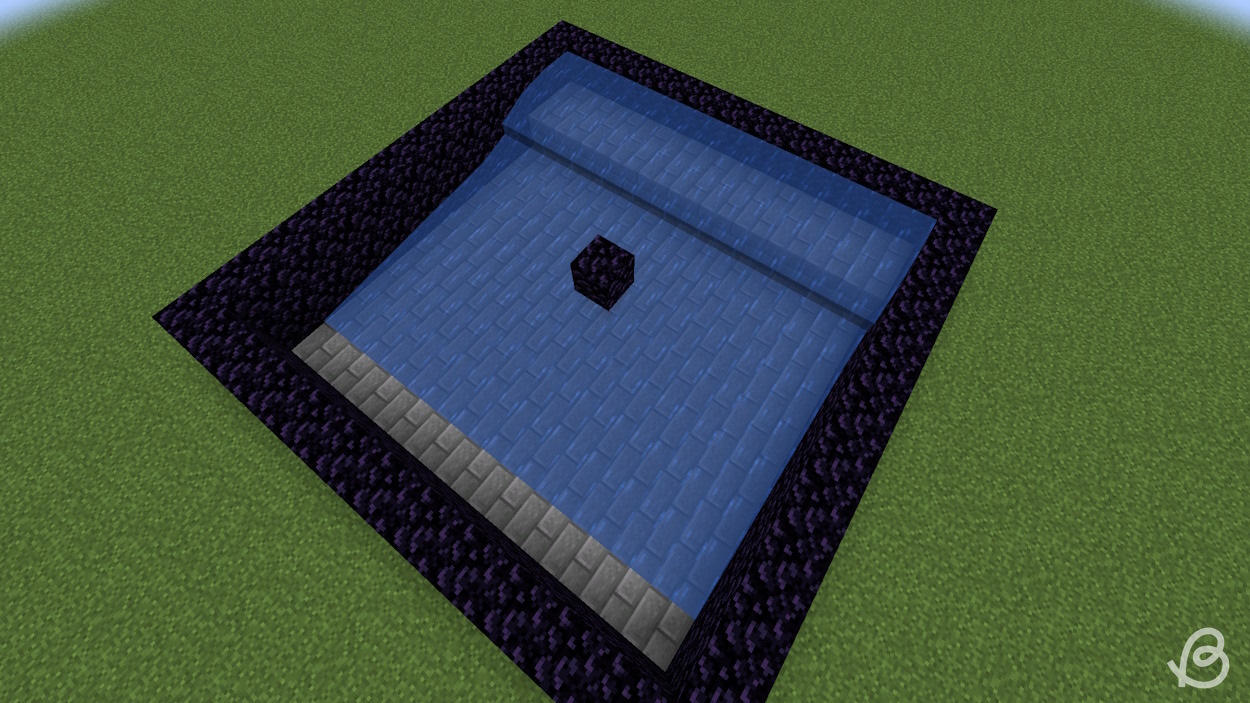
- Dig out a one block deep hole along the edge, right before the water stops flowing.
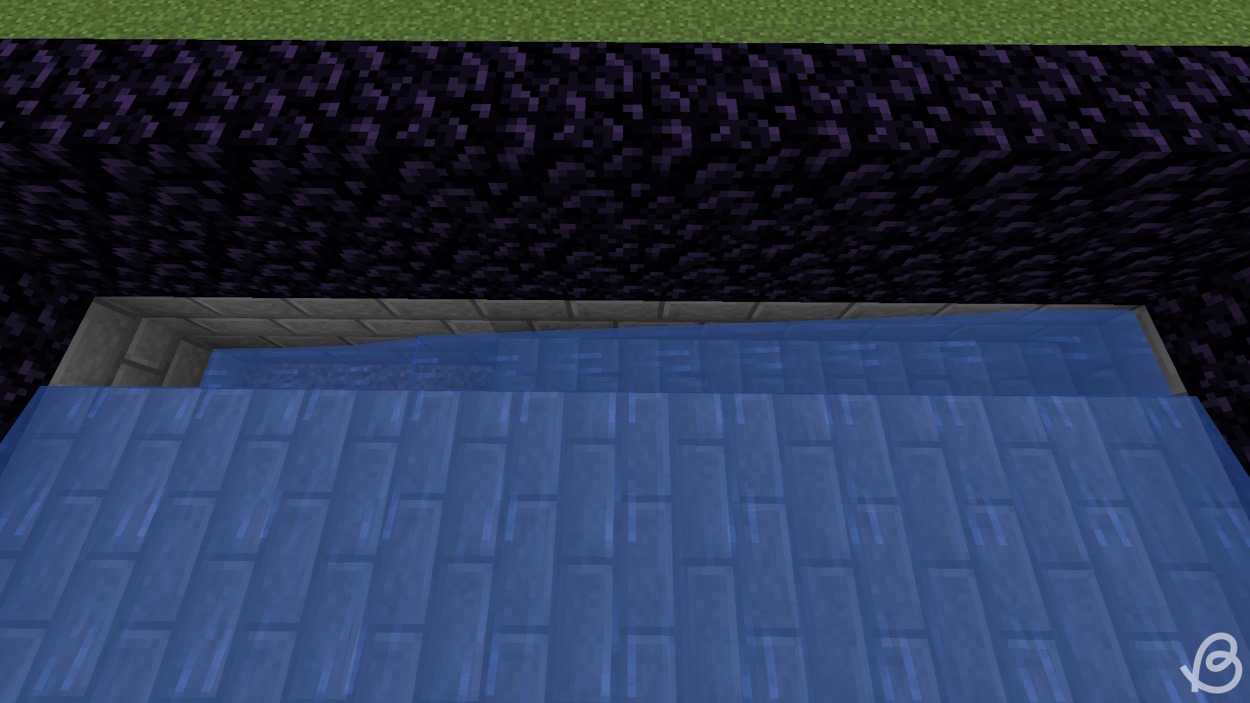
- Place a water source on the end opposite to where you want the chests to be. When the water stops flowing, start another one-block deep hole, one block before the water stops flowing to extend it.
- At the end, you can place a hopper facing into a chest. Place a stair above the chest to be able to open it and also to stop items from flowing past the hopper.
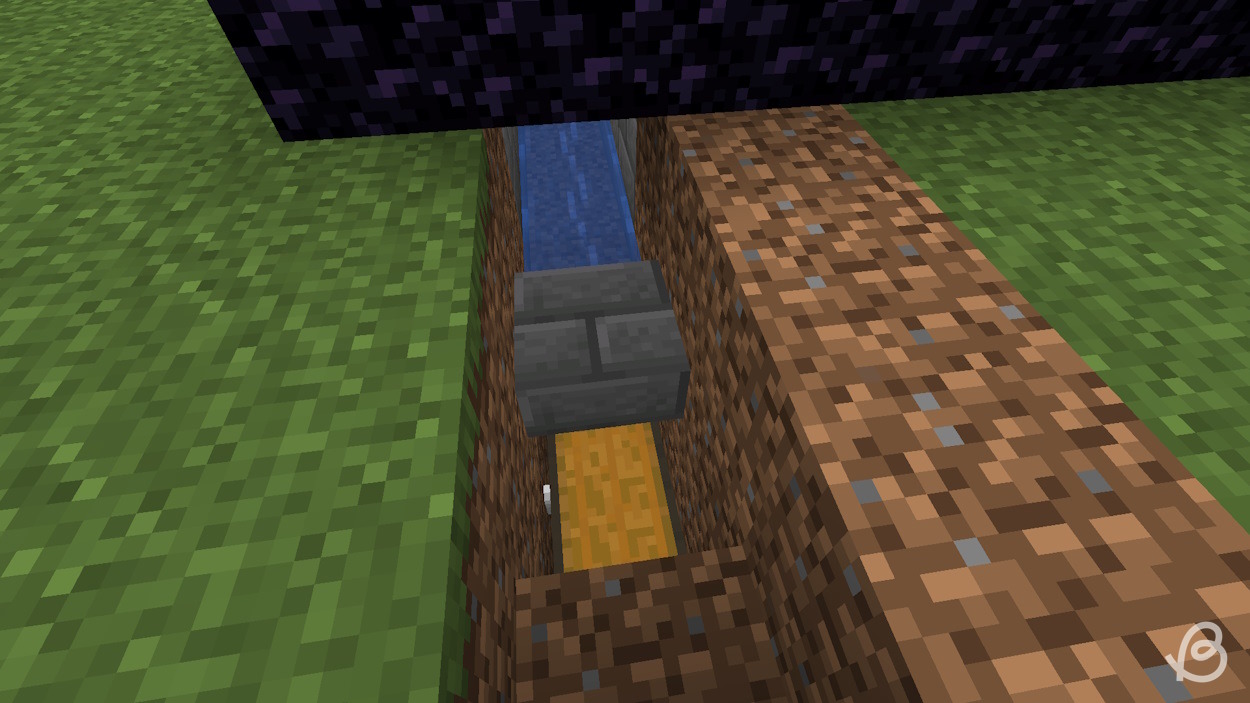
- You can then chain a bunch of hoppers and chests together, since this generator produces a lot of cobble.
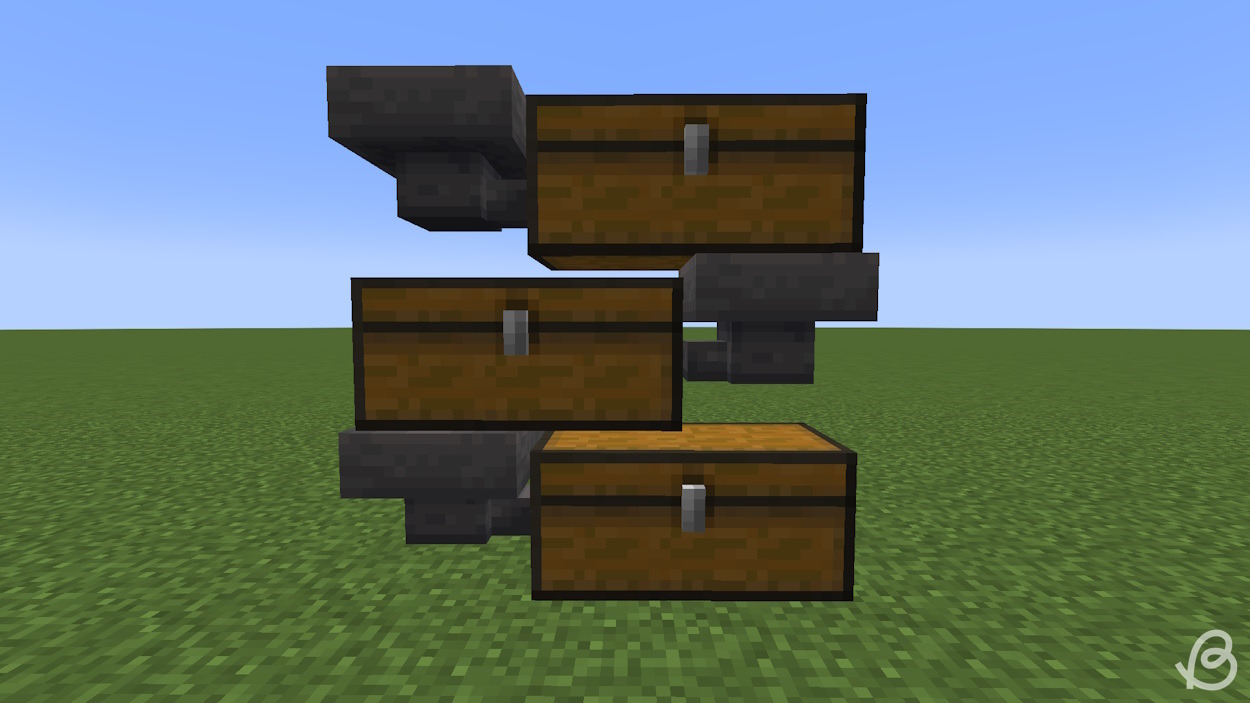
As soon as cobblestone generates, the observer will detect it and send a signal to the sticky pistons, which are going to pull the cobblestone blocks down. Then, after a short delay, regular pistons will push them forward, so the sticky pistons can continually pull the newly generated block down. This generator is fast and can break.
If the regular pistons reach their full push limit, the machine will start to malfunction and delete the lava above. So, make sure the pistons don’t reach their full push limit. A simple way to prevent this from happening is to deactivate the generator using the lever. If the lava gets deleted by the blocks, just refill it and the machine will function again.
And with that, we have reached the end of this guide. We have included four different cobblestone generator designs, so you can choose which one to build depending on the resources a hand. If you have never built this machine before, we recommend you try out the second design.
However, if you are experienced with those design, feel free to make the third or fourth cobblestone generator designs. With that said, what are you planning to do with all that cobblestone? Share with us and our readers in the comment section below!
The best cobblestone generator design is the fully automated one. It is rather expensive, but it will generate and collect cobblestone in the background, without you lifting a finger. Furthermore, the first design is the most iconic one and essential in the skyblock map.

