Do you see the Thunderbolt Bridge feature on your Mac but have no idea what it is and how it works? Well, you’ve landed at the right place. If you use Thunderbolt devices on your Mac for data transfer or other purposes, you’ll encounter a feature called Thunderbolt Bridge that provides a high-speed peer-to-peer network connection. This article will explain to you what is Thunderbolt Bridge, how it works, what are its advantages, and how you can set up and use Thunderbolt Bridge on a Mac. So, without any ado, let’s get started!
Thunderbolt Bridge on Mac & Its Advantages
With the macOS version Mavericks OS X, Apple introduced the Thunderbolt Bridge feature that allows high-speed data transfer between two machines using a Thunderbolt port. It provides a peer-to-peer connection and the file transfer via a Thunderbolt interface is much faster, compared to Wi-Fi or Ethernet. To use Thunderbolt Bridge, you’ll have to connect two Macs via a Thunderbolt cable and the system will then create an extremely fast and direct data link between the two machines. This feature works with various apps and features on Mac, including File Sharing, Internet Sharing, Target Disk Mode, Migration Assistant, and more.
You can use Thunderbolt Bridge to do the following:
- Professionals can transfer large files like photos & videos between Macs at a high speed.
- Share internet between two Thunderbolt devices.
- Back up and sync data your Mac data.
- Creatives can run resource-intensive apps or collaborate on large projects.
Set Up Thunderbolt Bridge on Mac
It’s easy to connect two Macs using Thunderbolt Bridge. If you’re connecting your Mac to a Thunderbolt device for the first time, you have to activate Thunderbolt Bridge in System Settings. Here’s how to do it:
- Connect your Mac to another Mac or a Thunderbolt device using a compatible Thunderbolt cable.
- Now, open System Settings on both Macs and choose Network from the left sidebar.
- Click on Thunderbolt Bridge.
- If you see a pop-up message saying “New Interface Detected”, click OK.
- On either of your Macs, go to the Thunderbolt Bridge section and select your Mac from the list of available services.
- Now, if you need to enter an IP address, click on “TCP/IP”, choose Manually in the “Configure IPv4” dropdown menu, and enter the IPv4 address in the IP Address field.
- If needed, you can also enter the subnet mask and router address.
- Click on OK.
- When the status is changed to Connected or Self-assigned IP, it means Thunderbolt Bridge is set up on both Macs and you’re good to go!
Transfer Files Using Thunderbolt Bridge on Mac
Once you’ve set up Thunderbolt Bridge, you can seamlessly transfer files between your Macs. Here’s how to do it:
- Open a Finder window on one Mac.
- Now, click on Network (below Locations) in the sidebar.
- On the other Mac, double-click on the Network icon and then click on the Connect As button.
- Next up, select a connection option and click on Connect again. If you can’t see the other Mac, make sure you’ve enabled File Sharing. For this, go to System Settings -> General -> Sharing and turn on the File Sharing toggle.
With this, you can access all the files and features on the other Mac, including the keyboard, display, and mouse.
How to Delete Thunderbolt Bridge on Mac
If you wish to remove the Thunderbolt Bridge from the available network interfaces on your Mac, you can do it with the following steps:
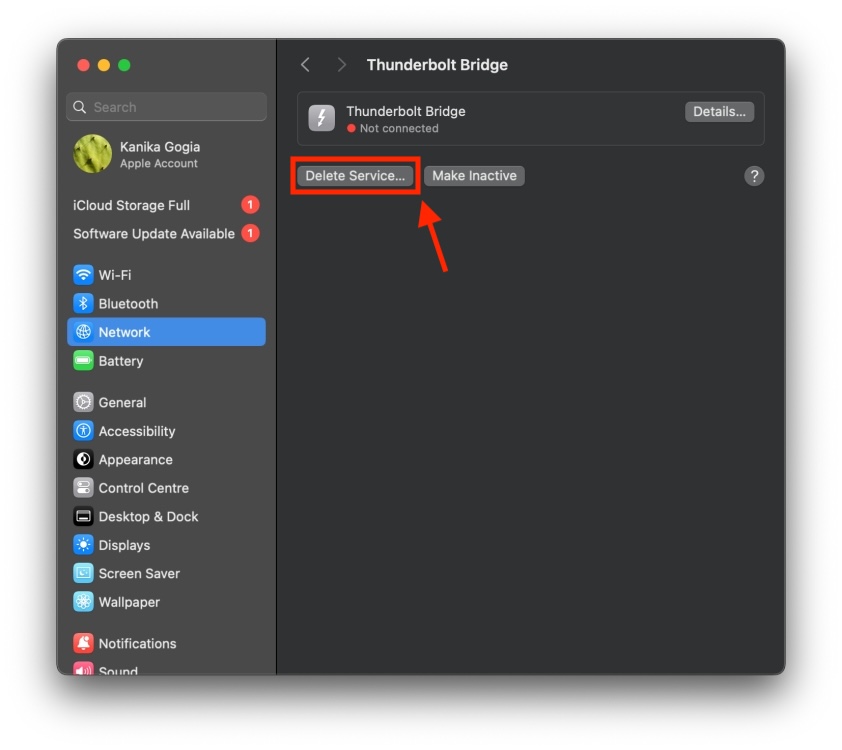
- Open the System Settings app and click on Network in the sidebar.
- Here, select Thunderbolt Bridge and click on the Delete Service button.

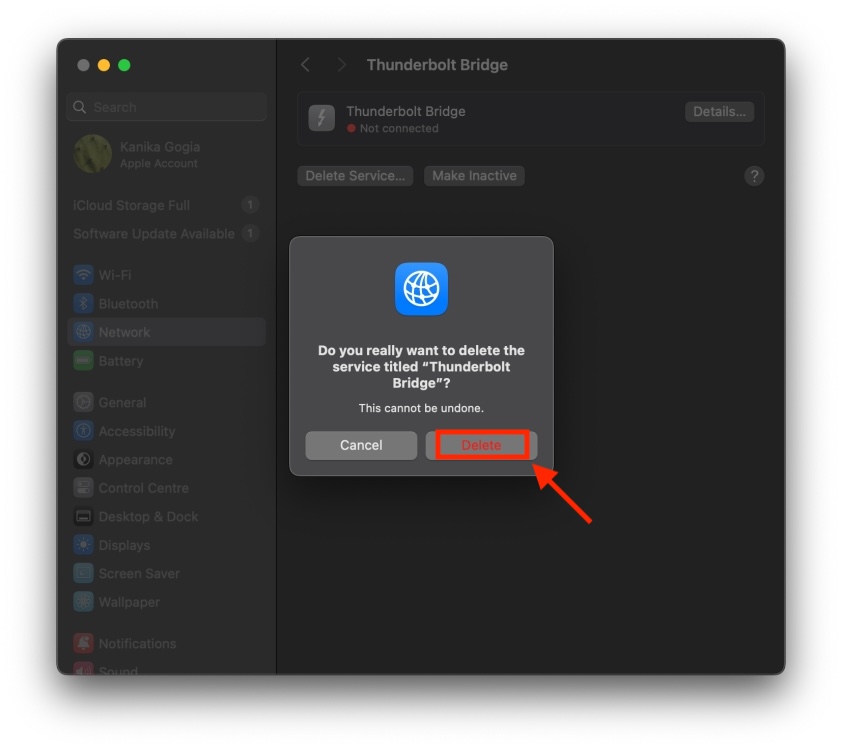
- Finally, click on Delete to confirm removal.

This will delete the Thunderbolt Bridge on your Mac and disables the connection. Since the action can’t be undone, you must be cautious. If you ever want to use Thunderbolt Bridge again on your Mac, you’ll have to create a new Thunderbolt Bridge connection.

